Eagle Cap and Mirror Lake Eagle Cap Wilderness Orergon

Eagle Cap Wilderness Wallowa Mountains

Eagle Cap Wilderness Wallowa Mountains

Eagle Cap and Mirror Lake Eagle Cap Wilderness Oregon
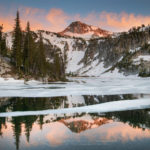
Eagle Cap reflected in Mirror Lake  #68776  Purchase

As part of the Summer 2020 Photography Tour, my first destination was the Eagle Cap Wilderness in northeast Oregon. Over the years I’ve repeatedly passed over this rugged wilderness while on my way to other destinations further east. Every time I would drive by on Interstate 80 I’d glance at them and promise to visit them next time. This went on for over twenty years! However, on this trip the stars aligned and I finally worked it into the schedule.

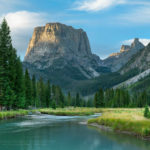
The Eagle Cap Wilderness sprawls out over most of the Wallowa Mountains. At over 360,000 acres it is the largest wilderness area in Oregon. That’s quite a lot of territory for such a small mountain range. A couple of other things also sets the Eagle Cap apart from other Oregon wilderness areas. First is its geology. Nearly every other mountain wilderness in Oregon is made up of various forms of volcanic rock. In contrast, the Wallowas contain mostly granitic rock. Secondly, the Wallowas are in a higher range. Many of the peaks are  1000′ – 2000′ higher than those in the Cascade Range to the west. And of course, due to its eastern location, the climate is drier, although the peaks still receive copious amounts of winter snow.

Eagle Cap, Eagle Cap Wilderness Oregon
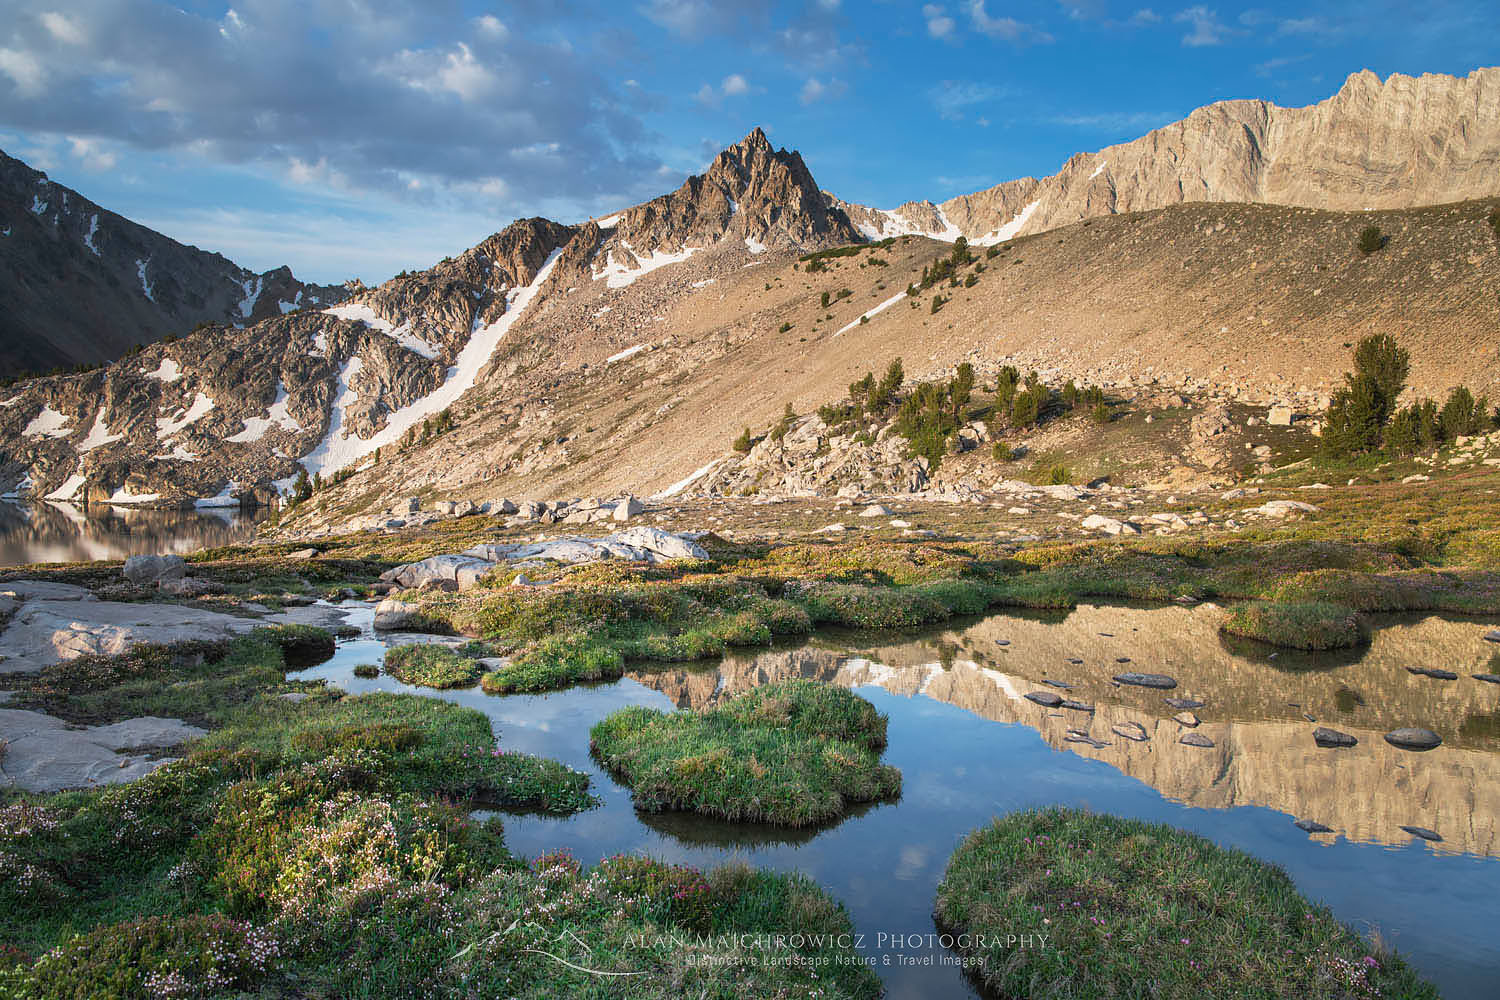
Eagle Cap #68862  Purchase

Backpacking In The Eagle Cap Wilderness

Since this was my first trip, and I wasn’t sure how long it would be before a return visit, I wanted to photograph in the most scenic locations. After poring over maps, online trip reports, and searching for photos of specific areas I settled on two destinations.

For nearly everyone, the central Lakes Basin is the prime spot for day hikes and overnight trips. This area is where the highest peaks and most of the alpine lakes are situated. Consequently, it is also the area that receives the most visitors. I chose two areas for this trip, and due to practicalities divided them into separate trips. The first would be an extended stay at Mirror Lake and several adjacent lakes, by way of taking the East Lostine River Trail. The second trip was to be a shorter one to Ice Lake via the West Fork Wallowa River Trail. Both trips would ensure excellent photo opportunities. The one uncertainty was the fact that despite it being nearly mid-July there still appeared to be a good deal of snowpack left in the alpine.

Lostine River Trail, Eagle Cap Wilderness, Wallowa Mountains OregonEast Lostine River Trail  #68765  Purchase

Hiking Into Mirror Lake

This trip was also to be my introduction to the realities of traveling during the COVID 10 Pandemic. Driving up the long, bumpy, and dusty Lostine River Road, where I was to spend the first-night car camping,  I found nearly every campsite was occupied. At the time I thought it was due to being the weekend. Later on, I would find out that where or when didn’t matter, crowds were everywhere. After finding a decent spot I sorted through and prepared all my gear for an early start in the morning.

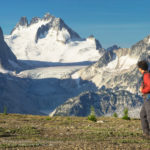
The next day I hit the trail bright and early and brimming with excitement about the views and pictures awaiting me. The first half of the East Lostine River Trail is fairly uneventful and typical of a forest approach hike. The second half, however, is very pleasant and scenic. This is due to the fact it enters a very long nearly flat sub-alpine valley with wide-open views for over a mile. During this section the trail skirts along open meadows, ponds, and the lazily flowing Lostine River. At the head of the valley looms 9572′ Eagle Cap Peak. This is where I first worried about the timing and feasibility of my two trips.

Eagle Cap Wilderness OregonEagle Cap Wilderness Cairn  #68822  Purchase

There were still numerous spots of avalanche snow left melting on the trail, and Eagle Cap, and the pass to Mirror Lake was nearly covered in snow. This left me thinking about the chances of successful photography, and of being able to visit all the lakes on my itinerary. The last mile or so to the pass was mostly over deep snow, although it was firm and post-holing was at a minimum. It was a pleasant surprise to find more open ground at the pass. Conditions at Mirror Lake were my main concern though.

Backcountry camp Eagle Cap Wilderness Oregon
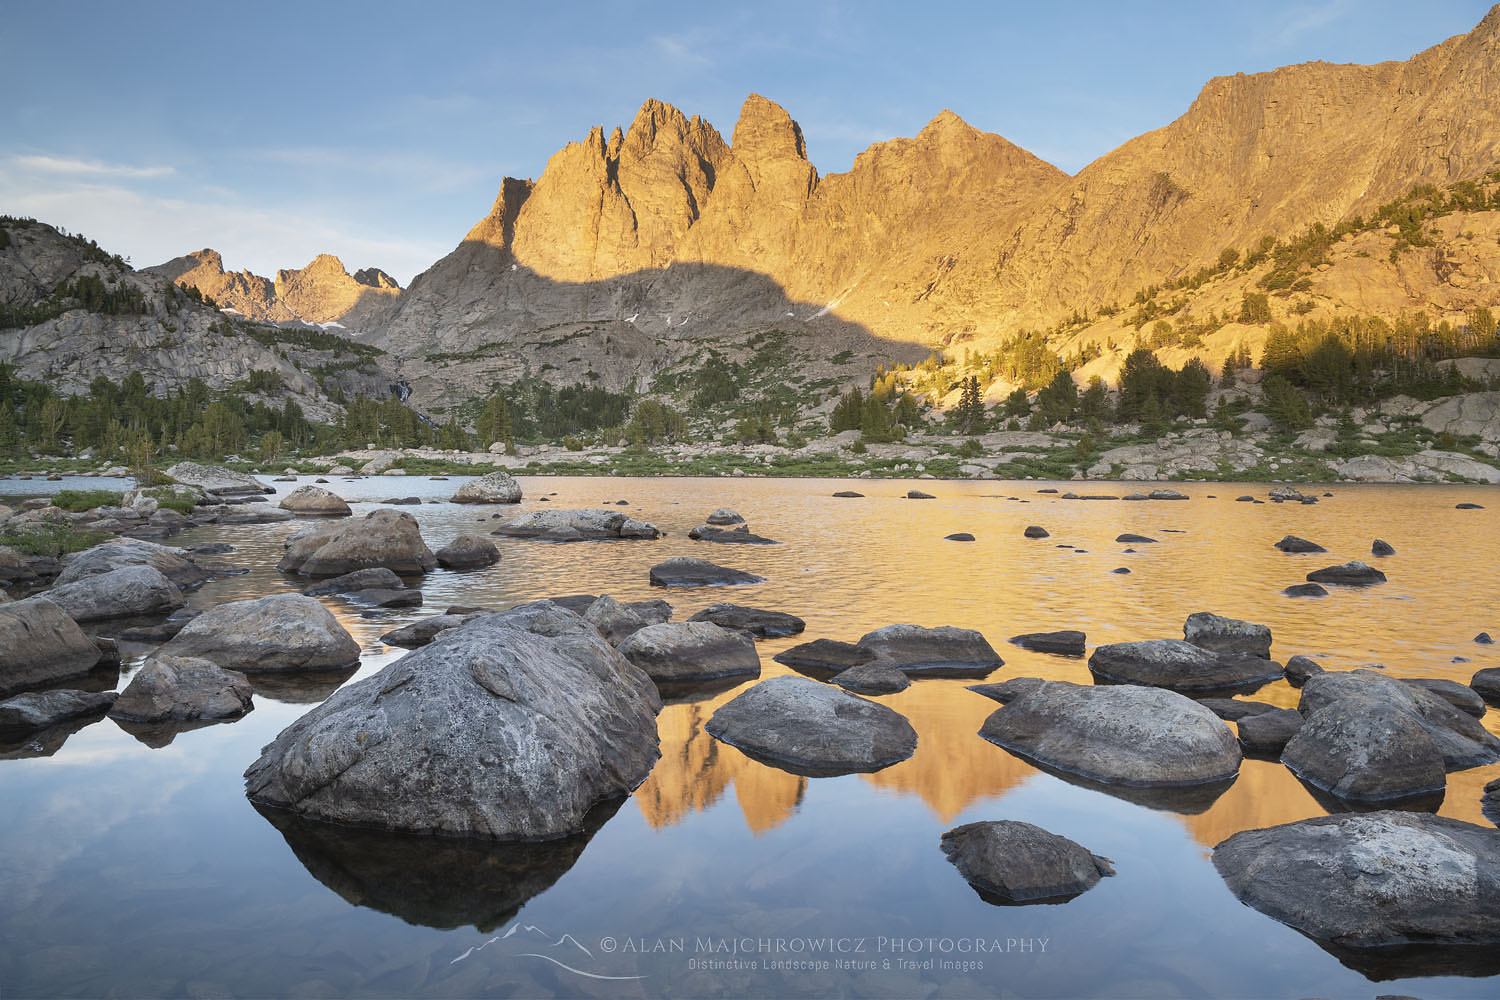
Mirror Lake Camp Eagle Cap Wilderness  #68804  Purchase

Mirror Lake Camping And Photography

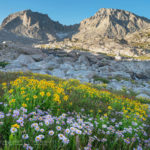
On approaching Mirror Lake at 7595′ I saw that its surfaces had about 75% ice on. Most of the open water was along the shoreline, which was good news for me. Also, the majority of designated campsites were still under snow. However, one especially attractive site near the lake was completely snow-free.

There probably wasn’t a better spot in miles. The view across the lake to Eagle Cap was outstanding, and if the light cooperated I was sure to come away with some great photos. As usual, I spent the rest of the afternoon scouting the area in advance for photo compositions. And while I found a few good ones the one near my camp was clearly the best, at least until all the snow melted.

Eagle Cap and Mirror Lake Eagle Cap Wilderness Oregon
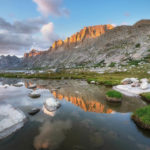
Alpenglow over Eagle Cap  #68793  Purchase

Up until that time I planned to move on the next day over another pass to Glacier Lake. But it was obvious the way would be entirely over snow, and since Glacier Lake was even higher up it was certain to be nearly frozen over. Because of this I reluctantly made the decision not to go, and spend more time in the immediate area instead.

During the afternoon the sky had clouded over,  and I thought I would be out of luck for a photo session with good evening light. But towards sunset, it became apparent that the clouds were starting to clear in the west. Soon sun rays began to stream through and illuminate the lake area and Eagle Cap.

Backcountry camp Eagle Cap Wilderness OregonMoccasin Lake Camp  #68814  Purchase

Moccasin Lake And Out

Since Glacier Lake was now out of the picture I went scouting higher up on the open slopes behind the camp and on the way to the other lakes in the basin. There was still too much snow to make the other lakes worthwhile so I went down to nearby Moccasin Lake. Even though it was only a few hundred feet lower there was considerably less snow. But unfortunately, I found only one established campsite. It was on a rock shelf above the lake with a great view, but it was also sorely overused. This must be the only site in the area since there was enough bare dusty ground for several parties.

I wasn’t as fortunate here with the light and compositions so I took advantage of clear skies to do some night sky Milky Way photography. The next day I decided to move back down the trail to the open meadows along the Lostine River. On my way in I saw some great photo opportunities in this area so I made this my final destination on this hike. After finding a hidden out-of-the-way campsite I was able to make several more evening photos.

Milky Way over Eagle Cap Wilderness OregonMilky Way Over Eagle Cap  #68819   Purchase

The next day I headed out with mixed feelings. On the one hand, I was able to spend some time in one of the best locations in the Wallowas and make some wonderful images to boot. On the other hand, the lingering snowpack prevented me from photographing some other great areas.

Afterward, I drove to Joseph Oregon to have a good meal. I also had to decide if it would be worth doing the second trip to Ice Lake. After agonizing over the decision it was apparent that it was still too early in the season to make it worthwhile for the photographs I had in mind.

So the next morning I began the drive to the second major destination of the summer photo tour, the Cecil D. Andus-White Clouds Wilderness of Idaho. Check back to read a post on that incredible area!

Eagle Cap, Eagle Cap Wilderness OregonEagle Cap Reflection  #68866 Purchase

If You Go:

Round trip to Mirror Lake from Lostine River Two Pan Trailhead:  14 miles
Elevation Gain:  about 2200′
Difficulty:  Moderate
Red Tape:  Northwest Forest Pass or America the Beautiful Pass required
Map: Green Trails Wallowa Mountains Eagle Cap Wilderness Map

The Two Pan Lostine River Trailhead is located about 18 miles south of Lostine Oregon, on Forest Road #8210. The last 10 miles are unpaved and can be rough in several places. Along Forest Road #8210 there are numerous small campgrounds and a few opportunities for primitive dispersed camping.

Note that Mirror Lake is only one of many backcountry destinations from this trailhead. Mirror Lake can be the only destination or be part of extended backpacking trips into the Wallowas. Check out the map in the link above for all the exciting possibilities.

The town of Joseph Oregon at the head of the very scenic Wallowa Valley makes a great base for trips into the Wallowas. It’s also a great jumping-off town for adventures in the Hells Canyon Recreation Area. It has everything you’ll need, from good food and lodging to brewpubs, a distillery, and outdoor recreation stores. There are also numerous local artists displaying their work in Joseph’s galleries. Make sure to check out the Josephy Center For Arts & Culture while you’re there.

Eagle Cap reflected in Mirror LakeEagle Cap Mirror Lake  #68801  Purchase

Leave No Trace

And now for a short lecture. As I’ve been saying in previous posts, don’t even think about visiting this or any other wilderness area unless you are prepared to follow the guidelines of Leave No Trace (LNT). The Eagle Cap and all other wilderness areas throughout the world are under incredible pressure from growing amounts of visitors. Please do your part to tread lightly and help preserve these precious areas for future generations!

To learn more about the principles and practicing LNT please take a few minutes to visit the Leave No Trace Center for Outdoor Ethics. Your children and grandchildren will thank you!

Seven Leave No Trace Principles

  • Plan ahead and prepare.                                       
  • Travel and camp on durable surfaces.                 
  • Dispose of waste properly.                                                                         
  • Leave what you find.                                            
  • Minimize campfire impacts (be careful with fire).
  • Respect wildlife.  
  • Be considerate of other visitors.

Photo Gear Used On This Trip

Nikon D850
Nikkor Lens:
14-24mm 2.8G ED
24-70mm 2.8E ED
70-200mm 2.8E FL ED
Gitzo 1532 Tripod
Really Right Stuff B-55 Ball Head
Assorted Lee Graduated Neutral Density Filters
B+H Polarizing Filter
Vello FWM-N2 Remote Shutter Release

If you enjoyed reading Eagle Cap Wilderness Wallowa Mountains please share it with your friends and family.

All photos appearing in Eagle Cap Wilderness Wallowa Mountains are available for Commercial Licensing and Fine Art Prints. Click on any image to purchase, or contact me for more info!

Eagle Cap reflected in Mirror Lake, Eagle Cap Wilderness Oregon

2020 Summer Photography Tour Update

2020 Summer Photography Tour Update:

Eagle Cap Wilderness Oregon 2020 Summer Photography TourEagle Cap Wilderness Oregon #68793  Purchase

With over two weeks into the 2020 Summer Photography Tour it’s time to post a brief update. So far my travels have taken me to the Palouse Region of Washington State, the Eagle Cap Wilderness of Oregon, and the White Clouds Wilderness of Idaho. Next up is the Wind River Range of Wyoming. Although last year’s trip also took me to the Winds, this year I’ll hit some new locations.

The next destination after my stay in the Winds is still to be determined. However, a drive along the Beartooth Highway may be possible before heading into Montana.

Appearing in this post are some of the photo highlights so far. These photos are quick on the road edit and processing with the final image to come later when I’m back in the office. Image licensing and fine art prints are available for all of them, but print orders may be delayed several weeks.

Eagle Cap Wilderness Oregon 2020 Summer Photography TourEagle Cap Wilderness Oregon

Palouse Washington 2020 Summer Photography TourPalouse Washington #68706  Purchase

White Clouds Wilderness Idaho 2020 Summer Photography TourWhite Clouds Wilderness Idaho #68943  Purchase

White Clouds Wilderness IdahoBoulder Lakes White Clouds Wilderness Idaho #68953  Purchase

White Clouds Wilderness IdahoWhite Clouds Wilderness Idaho #68968  Purchase

Snake River Plains Wheat Fields near Swan Valley, IdahoSnake River Plains Wheat Fields Idaho #69008  Purchase

All photos appearing in 2020 Photography Tour Update are available for Commercial Licensing and Fine Art Prints*.

*Print orders may be delayed several weeks until I return to the office.

Want to learn more about Landscape & Nature Photography? Take your Creative Photography to the next level with  Private Instruction and Guided Photo Tours.

Castle Reef Mountain Sun Canyon Montana

Photography Tour Summer 2020

Photography Tour Summer 2020

Castle Reef Mountain Sun Canyon Montana Photography Tour Summer 2020Castle Reef Mountain Montana #68136  Purchase

Photography Tour Summer 2020 begins on July 7! For obvious reasons it has been extremely difficult this year to plan photo shoots, and I’m incredibly excited to get back to work on the road and trail. Many locations I was hoping to photograph remain closed or have difficult travel restrictions in place. With this in mind, I decided to once again make this year’s photography tour based on wilderness backpacking. Not only is it a method of photography I thoroughly enjoy, but in the current climate, it is also safer.

As with the 2019 photography tour, this year will include some new destinations I haven’t yet photographed, along with old favorites where I need more in-depth coverage. In some ways, this trip will be a continuation of last year’s. Most locations will be in the Northern Rocky Mountains and will include some that I couldn’t get to last year.

Red Barn Wallowa Valley Oregon Photography Tour Summer 2020Wallowa Valley, Oregon #61145  Purchase

Eagle Cap Wilderness Oregon

The first stop will be the Eagle Cap Wilderness of Oregon’s Wallowa Mountains. This is a destination that has been on my see and photograph list for many years, but for various reasons, I’ve passed them up. On this trip, I hope to photograph many of the alpine lakes in the core loop of the range.

The Wallowas, located in the northeast corner of the state, is a unique range in Oregon. While most mountains in Oregon are made of volcanic rocks the Wallowas are mainly granitic and have a more rugged appearance. The Eagle Cap Wilderness is the largest in Oregon and is host to many alpine lakes and some of the highest peaks in the state.

Little Redfish Lake Sawtooth Mountains Idaho Photography Tour Summer 2020Little Redfish Lake, Sawtooth Mountains Idaho #66235  Purchase

White Cloud Wilderness Idaho

Last year while backpacking and photographing in the Sawtooth Mountains of Idaho I saw another range of high mountains to the East. After some research, I found out that they were peaks of the White Cloud Wilderness, part of the newly created Boulder-White Cloud Wilderness. With the other units being the Jim McClure-Jerry Peak Wilderness, and the Hemingway-Boulders Wilderness. Together they protect 275,000 acres of spectacular mountain wilderness in Central Idaho.

Rising just across the valley from the more famous and popular Sawtooth Mountains, the White Clouds also have many peaks over 10,000′ with numerous alpine lakes. However, since it is less well-known I’m expecting a greater degree of solitude. On this initial visit, I hope to visit and photograph many of the peaks and lakes in the core area.

Mount Bonneville Wind River Range WyomingBonneville Lake Wind River Range #66285  Purchase

Wind River Range Wyoming

Last year I spent considerable time photographing in the “Winds”.  However, it is a big range with enough destinations to fill a lifetime of exploration. This year I plan to visit a few new spots and return to a couple of classics. One possible backpack is Desolation Valley/Hailey Pass-Washakie Pass Loop. Another is Middle Fork Lake and Pronghorn Peak in the central part of the range. Finally, a return trip to Cirque of the Towers and Deep Lake is also on the table.

Castle Reef Mountain Sun Canyon MontanaRocky Mountain Front Range Montana #68145  Purchase

Bob Marshall Wilderness Montana

Affectionately known among locals and avid backpackers as “The Bob”, this is another wilderness destination that has been on my must-see list for decades. The Bob Marshall Wilderness Complex is a huge swath of land straddling both sides of the Continental Divide. An important part of the Greater Yellowstone Ecosystem it is home to the largest intact population of Grizzlies in the lower 48.

The Bob was one of the first areas I wanted to see when I started backpacking in my late teens. Unfortunately, it was passed over and forgotten many times over the years in favor of other destinations. This year I hope to remedy that oversight. The sole destination on this trip will be a multi-day backpack to the famous Chinese Wall and the meadows along its base. This is arguably the signature feature of the complex, a 12-mile-long 1000′ high limestone escarpment on the Continental Divide.

Bighorn Canyon National Monument MontanaBighorn Canyon Montana #52263  Purchase

Other Montana Destinations

Last year, due to limited time and weather, I had to skip a few destinations in Montana. Hopefully this year I’ll get to photograph them. While this writing is not certain, Bighorn Canyon National Recreation Area, Beartooth Highway, and the Upper Missouri River Breaks are back on the list. Then of course there are also several backcountry destinations in Glacier National Park I’d like to photograph, but that’s probably going to be a stretch.

Backpacker on Titcomb Basin Trail Wind River Range WyomingWind River Range Backpacking #66780  Purchase

List of Locations:

Below is the list of the Summer 2020 Photography Tour locations in the order of start to finish. I would love to hit all of them but of course, time and weather will dictate my itinerary. If you’re planning on traveling to any of them let me know. I’d love to meet up if possible!

Eagle Cap Wilderness, Oregon
White Cloud Wilderness, Idaho
Wind River Range, Wyoming
Beartooth Highway, Wyoming/Montana
Bighorn Canyon National Recreation Area, Montana
Upper Missouri River Breaks, Montana
Bob Marshall Wilderness, Montana
Glacier National Park, Montana
*Locations subject to change due to weather and travel restrictions

All photos appearing in Photography Tour Summer 2020 are available for Commercial Licensing and Fine Art Prints

Want to learn more about Landscape & Nature Photography? Take your Creative Photography to the next level with  Private Instruction and Guided Photo Tours.

Photography Tour Summer 2020

Hannegan Peak backcountry camp North Cascades

Backpacking Photography Tips

Backpacking Photography Tips

Hannegan Peak backcountry camp North Cascades Backpacking Photography TipsMount Baker Wilderness North Cascades #54316r  Purchase

Photography has always been an essential element of vacations. Since the first portable roll film camera was introduced people have been taking pictures of their travels. And backpacking trips into wilderness areas are certainly no exception. In this post, I’ll be offering some backpacking photography tips to help make your trip a success.

My previous post, Backpacking Photography Gear Tips, went into some of the details of choosing the proper photography and backpacking equipment. This time I’ll give tips on photography while backpacking on the trail.

For the purpose of this post, I’ll focus on some basic tips for working in the field which can help to free your creativity.

Mount Robson Canadian Rockies Backpacking Photography TipsMount Robson British Columbia  #54646  Purchase

Set a Goal

Setting a goal for yourself can vastly help in making better photographs. These goals can vary depending on a number of factors, such as:

  • Location
  • Season
  • Weather
  • Subject matter
  • Time available
  • Physical condition

On a backpacking trip you may need to place a limit on and be flexible with your goals. For example, if your goal is action/adventure photography your opportunities for landscape or nature photography will be limited. Or if your goal is to photograph dramatic landscapes but the weather is consistently gray,  consider changing your goal to nature details and or abstracts.

Backpacker Wind River Range, Wyoming Backpacking Photography TipsBackpacking in the Wind River Range #66330  Purchase

Know Your Limits

Remember that your pack will most likely be fairly heavy, and will determine how far and fast you can travel. Don’t push yourself beyond your limit. Take it easy and break your hiking distances into manageable lengths. If you arrive at camp physically exhausted you won’t have much energy left to making good photographs. Unless the perfect image is right in front of your tent you’ll need to be on the move until after sunset.

Carefully research your trip in advance. Check out trip reports and maps, and pay particular attention to elevation differences from point to point. You may think that you can easily hike 15 miles in a day. However, that distance will be considerably less when you throw in 3000′-4000′ elevation gain while carrying a full pack.

Also, know your location. Backpacking in Wyoming’s Wind River Range is vastly different from backpacking in the North Cascades. In the Winds, you gain elevation gradually with many ups and downs. In the North Cascades, large amounts of elevation are gained either by endless switchbacks or straight-up endurance tests.

Glacier Peak Image Lake North CascadesGlacier Peak and Image Lake North Cascades #58239  Purchase

Know Your Subject Matter

This may be the most important tip I have to offer.

The best portrait photographers will always tell you this. Being keenly aware of, and bringing out the nuances in someone’s personality is the key to great portrait photography. This is also true for other subject matter, including landscape and nature.

One of the best ways of accomplishing this is to just sit and observe, be meditative. Consider the current catchphrase Light And Fast. Going light is good, but why fast, what’s the rush? Isn’t wilderness something to be savored? Aside from photography aren’t you also here to get away from the rush and complexities of daily living?

Slow down and think creatively, you’ll enjoy your trip more and make better images.

It’s easy to backpack into a beautiful area, set up camp, grab your camera and snap your brains out. However, when you get back home you most likely will have only snapshot quality photos.

While on the trail be observant of your surroundings. Take frequent breaks and enjoy the scent of the forest and the sounds of the birds and streams. After setting up camp use this time to relax and restore your physical and mental energy.

Be particularly aware of how the light changes. The position of the sun and the type of light can make the difference between a good and great photo.

See and photograph with your own eyes. Don’t set out armed with GPS coordinates just so you can replicate the other guy’s photo.

Know your subject and photograph deliberately.

Mount Baker Wilderness campsite Backpacking Photography TipsBackcountry Camp Mount Baker Wilderness #53372  Purchase

Selecting A Campsite

Ideally, you’ll need to select a campsite or base camp on longer trips, that is in close proximity* to your subject matter. If your campsite is a mile or more from that perfect mountain view or field of wildflowers you’ll need to rush to get there in time to set up.

This is especially important at sunrise. It’s incredibly easy to just sleep in if you need to make a long pre-dawn trek to that great composition. Especially if it’s several hundred feet higher up. In a perfect situation, you should have a variety of compositions to photograph within a quarter-mile of camp.

If you’re backpacking in a National Park or Wilderness Area with camping restrictions your options may be limited. National Parks deliberately, and for good reasons, limit camping proximity to pristine locations. Always do your research and check in advance. In these situations, you may have to plan on some extra legwork.

*Whenever possible camp only on hardened established sites, bare ground, rock, or snow. This may not be an option in very remote or rarely visited areas. Scroll down to read about minimal impact and Leave No Trace Principles.

Backpacker Baker Lake Trail North CascadesBackpacker North Cascades #65027 Purchase

Location Scouting

Good location scouting begins at home while researching your trip. Trip reports and guidebooks usually include photos of the area. Poring over topographic maps can give clues to directions of light, and hidden features. Goggle searches of your trip area using different keywords can also reveal little-known spots.

1.    If you planned carefully you should arrive at and set up camp early enough to have time to relax and do some scouting. Aside from obviously finding the best spots for compositions, scouting also gives you an opportunity to get to know your subject better.

2.   Walk through the entire area, and look beyond the obvious. While the big snowcapped mountain may be the obvious dominant element, there may be other compositions more subtle yet just as inspiring. It’s easy to focus your attention on the main scene during golden hour and completely miss something even better in the opposite direction.

3.   Be aware of where the sun will rise and set in relation to the landscape. That perfect composition may be in shadow during morning and evening golden hours. This is particularly true in deep narrow valleys.

4.   Be observant of cloud and weather patterns. Some mountain ranges are prone to dramatic midday storms. However, at sunset and sunrise, the sky may be devoid of any clouds. Of course, in some areas, the opposite may be true. That gorgeous summit may be consistently shrouded in clouds at sunset.

5.   Look for key elements which can you can use in compositions. For a mountain scene, a foreground with a winding stream or a grouping of wildflowers can add movement and depth to the image. Objects such as boulders, a distant tent, or a person can also add scale to the scene.

Limestone Lakes Basin Height-of-the-Rockies Provincial Park British ColumbiaLimestone Lakes British Columbia #46236  Purchase

Commit to Photographing

Face it, backpacking and the related chores of camping are a lot of work. But it’s only one-half of the work you’ll face when you’re there to make excellent images. While other parties are sitting around camp enjoying the sunset, or sleeping late the next morning, you need to be on the move.

1.    Don’t be in a rush, plan in extra days. Good light and photography rarely happen on your schedule. An extra day or two in an area increases your chance of getting the light you want.

2.   Get accustomed to rising before dawn in the morning. How early you need to get up depends on how far you are from where you need to photograph. You can always get more sleep when you return to camp.

3.   Stick it out until it’s really over. Some photographers pack it up right after the sun sets or rises. Big mistake. I can’t tell you how many times it appeared like all the best light was gone, only for the sun to find a gap in the clouds and come back in full force. Sometimes you’ll be faced with a boring cloudless sunrise when a few minutes later glowing wisps or puffy clouds develop literally out of nowhere.

4.   Wait for the afterglow. Often, hidden beyond your view, there may be some atmospheric elements that create a beautiful long-lasting afterglow.

5.   If the sky is clear of clouds and there is no afterglow it’s always worth waiting to photograph the Belt of Venus and during the blue hour.

6.   Stay up late or wake up earlier for photographing the Milky Way.

7.   With the right conditions excellent images can be made throughout the day, not just during golden hours. Always keep your mind and eyes open to new creative opportunities.

8.   Wait out the weather. You’ve put a lot of time and energy into getting here. Stick it out if you can.

Glacier Peak backcountry camp North CascadesGlacier Peak Wilderness #58315  Purchase

Eat Well and Smart

Good nutrition is important to maintain the energy you need to sustain a high level of activity. There are endless books, articles, and opinions available to help guide you and confuse you on this topic. Everybody is an expert and will be happy to point out why their research is right and yours is wrong.

I’m not a nutrition expert but I have found out through experience what works for me and what doesn’t. Everybody is different. You’ll need to find a balance of taste, convenience, and nutrition that works for you, preferably in advance of a long trip.

1.    Whatever choice of food make sure you bring enough. You’ll be burning a lot more calories per day than you normally would.

2.   Keep your menu as simple as possible, and look for dehydrated or freeze-dried items to keep the weight down.

3.   For safety in bear country avoid foods with strong odors. Only prepare as much as you can eat, leftovers attract not only bears but also rodents.

4.   Try to bring items that can be prepared by just adding boiling water. The time you save can be spent photographing. You’ll also save weight on fuel.

5.   When on the trail stay well hydrated, and drink an electrolyte replacement instead of plain water. Over the years I’ve tried many, most taste horrible and are ridiculously expensive. I’ve gone back to Gatorade, it tastes better, is cheap, and works for me.

6.   Bring enough energy bars (again, most taste horrible) or trail mix to last the duration of your trip. It’s also a good idea to pack a few special treats to break up the monotony.

7.   Supplements are optional and subjective. I always take a B Complex supplement daily. I find it helps in converting nutrients into energy, but that’s just my opinion.

Backcountry camp Coast Mountains British ColumbiaCoast Mountains British Columbia #61795  Purchase

Leave No Trace

I’ve recently started to add this extremely important topic to all of my hiking posts. Don’t even think about visiting backcountry areas unless you are prepared to strictly follow the guidelines of Leave No Trace (LNT).

All national parks and wilderness areas throughout the world are under incredible pressure from growing amounts of visitors. Please do your part to help preserve these precious areas for future generations!

To learn more about the principles and practicing LNT please take a few minutes to visit the Leave No Trace Center for Outdoor Ethics. Your children and grandchildren will thank you!

Seven Leave No Trace Principles

  • Plan ahead and prepare.                                       
  • Travel and camp on durable surfaces.
  • Dispose of waste properly.                                                                         
  • Leave what you find.                                            
  • Minimize campfire impacts (be careful with fire), better yet don’t build one in the first place, they are completely unnecessary
  • Respect wildlife.  
  • Be considerate of other visitors.

Now that you have some basic understanding of working in the field, get out there and have some fun!

Also, check out these blog posts for hiking and backpacking and photography destinations:
Mount Baker Wilderness Destinations
Hannegan Peak Ruth Mountain Mount Baker Wilderness
Lake Ann Ptarmigan Ridge Mount Baker Wilderness
Coyote Gulch Backpacking Photography

If you found reading Backpacking Photography Tips to be  enjoyable and informative please feel free to share it with friends and family

Ever wonder what it’s like photographing landscapes and nature for a living? Check out my blog post:
What is it like to be a Professional Landscape Photographer?

All photos appearing in Backpacking Photography Tips are available for Commercial Licensing and Fine Art Prints

Want to learn more? Take your Creative Photography to the next level with  Private Instruction and Guided Photo Tours.

Mount Robson British ColumbiaMount Robson British Columbia #54618  Purchase

Backpacking Photography Tips

Backpacker Bugaboo Provincial Park

Backpacking Photography Gear Tips

Backpacking Photography Gear Tips

Backpacker Bugaboo Provincial Park Backpacking Photography Gear TipsBugaboo Provincial Park British Columbia 

For most people bringing back photos from a backpacking trip is essential. Who doesn’t want to share their adventure with friends and family on the social media beast?

The big question is what is the end use for those photos, and what photo gear should you take to meet that end? Ask 100 photographers that question and you’ll get 100 different answers. And there really are no wrong answers here.

For the purpose of this post, I’ll focus on backpacking photography gear tips for photographers that may be in the advanced amateur to aspiring pro levels.

Mount Baker Wilderness campsite North Cascades Washington Backpacking Photography Gear TipsMount Baker Wilderness North Cascades

It’s All About Weight

Get used to it, if you’re into serious photography while backpacking your pack will be heavy, period.

Only you can determine how much weight you can comfortably carry and for how far. There are endless variables that determine what you should or shouldn’t bring, such as photography goals, trip length, elevation gain, trail or off-trail routes, and seasons, to name a few.

Basically though, carrying too much weight can turn your trip into a grueling muscle cramping ordeal. And at the end of the day, you won’t have any energy left for photography. Believe me, I know what I’m talking about here. For 20 years I lugged around a 4×5 film camera with four lenses, 18 film holders, a film-changing tent, extra film, a light meter, a tripod, filters, etc. All this photo gear alone was well over 35 pounds.

So here are my gear tips for helping to make your backpacking photography trip more successful and enjoyable.

Disclaimer: The following tips are offered from my personal experience and preferences after many years of backpacking photography. What works for me may not work for you.

Backcountry camp North Cascades National ParkBackcountry camp North Cascades National Park

Photo Gear

There isn’t much you can do here for weight savings. You can’t shave off pieces of your camera or lens to cut down on weight. And this isn’t the category for scrimping on quality to save weight. My choice of photo gear may be on the heavy side, but it ensures high-quality results.

  • Camera:

    One camera body. The best you can afford. It doesn’t matter if it’s digital or film or, which brand, as long you can change lenses. Make sure it has a high-quality sensor with enough megapixels sufficient for your end-use. A 20-megapixel body may be good enough for social media sharing, but not probably for making large-format fine art prints.

    Pro Tip:   Pro or Prosumer level cameras are much more rugged, and have better weather seals than consumer-level cameras. Something to consider if you regularly visit dusty, and or rainy environments, or are hard on your gear.

My Gear:
Nikon D850 Yes, it’s heavy, but it’s well-built with all the features I need and more. Its 45.7-megapixel sensor is outstanding for night sky photography and mural-size prints.
Really Right Stuff L Plate Used for quick release in conjunction with Really Right Stuff Tripod Ballhead.

Alice Lake camp Sawtooth MountainsIlluminated tent, Sawtooth Mountains Idaho

  • Lenses:

    Wide or ultra-wide to short telephoto lenses will cover most situations. Again, go with the highest quality you can afford. It would be ideal to bring just one zoom lens with a focal length of 20-200mm. However, the quality of such a lens may not be optimum.

    Many photographers will swear by the quality of prime lenses, but for our purpose bringing an armload of them isn’t practical. One wide-angle zoom lens, plus a normal to short telephoto zoom lens would be a good option.

    Pro Tip:  High-quality lenses are always more important than the camera body. The most expensive camera or post-processing editing app can’t make up for an inferior-quality lens.

My Gear: 
Nikon 14-24mm 2.8 This lens is considered by many landscape photographers to be the gold standard of wide-angle zooms. I can attest that it is extremely sharp, and has minimal distortion and chromatic aberration.
Nikon 24-70mm 2.8E ED VR  There are arguably smaller, lighter-weight, and cheaper lenses in this focal length. But for me, this lens has proven its worth many times over. It’s tack sharp, and the VR feature is outstanding for handheld work.
Nikon 70-200mm 2.8E FL ED VR  Again, it’s a heavy and expensive lens, but for me, its high-quality glass and features are worth every ounce.

  • Tripod:

    A tripod is an essential piece of photo gear. Night photography would be impossible without it. So would close-ups of flowers, long exposures of flowing water, and techniques such as focus stacking.

A tripod is also one item where you may be able to get away with choosing a lighter-weight model. This is especially true if your camera body and lens combination is on the lighter side.

Many manufacturers offer tripods with three or four-section legs. I prefer three, simpler, fewer parts that can fail. Also, make sure your tripod is tall enough for your needs. Carbon fiber tripods are your best option, they’re slightly lighter than metal and very durable. They also won’t freeze your hands in cold weather light metal does.

In recent years ball heads have become the standard, and I find them to be a vast improvement over older-style handles and knobs.

Pro Tip:   Do not opt for an inexpensive poorly-made tripod with plastic components! They are not stable and break very easily. I was once in desperate need of a replacement tripod while on location. All I could purchase was a cheap lightweight model. Even with everything locked down as much as possible, it was like using a wet noodle to support my camera!

My Gear:
Gitzo GT 1532 Mountaineer Series 1
Really Right Stuff BH-55 Ballhead with quick release plate.

Backcountry camp North CascadesMount Baker Wilderness North Cascades

  • Filters:

Polarizing Filter. Probably one of the most indispensable filters to bring along. Just be careful not to overdo the effect of darkening a sky. Also, keep in mind their limited effect when using wide-angle lenses.
Graduated Neutral Density Filters. I still find them extremely useful. But If you’re looking to save weight you could leave these at home, and produce their effect in post-processing. They are not always the best option in certain circumstances. However, when possible I will always prefer to use them to make the best exposure in the field, and not rely on post-processing techniques.

My Gear:
B+H Polarizing Filter
Lee Graduated Neutral Density Filters: Four filters; 1 & 2 Stop soft and hard edge.
Lee SW150 Mark II Filter System, necessary to accommodate Nikon 14-24mm lens

  • Miscellaneous Gear

    Extra Batteries. I always take three fully charged batteries, one in the camera and two extras. On a recent 10-day backpack, I still had about half power left on my last spare. Be aware that mirrorless cameras may consume more battery power.
    Extra Memory Cards. 
    Remote Shutter Release. Weighs next to nothing and helps in reducing camera shake.
    Micro Fiber Cleaning Cloth. Essential for cleaning lenses and filters
    Camera Chest Pack. I find this optional item to be extremely useful. Not only does it give me quick access to my camera while on the trail, but it also has room for small items such as trail snacks and maps.
    My Gear:
    Lowepro Toploader Pro 75 AWII

Backpacker Glacier Peak Wilderness Backpacking Photography Gear TipsBackpacker Glacier Peak Wilderness

Backpacking Gear

Here is where you’ll have the most opportunities for saving weight while on the trail. It’s also where you can spend or save lots of money. Once again how light you go depends on your destination, how long you will be out, and what season you’ll be backpacking in.

Going Ultralight is the catchword of the day, and gear manufacturers are cashing in on it big time. Just be aware that ultra-expensive ultralight gear may not be ultra-durable, especially when the weather turns nasty, and after a few seasons of use.

Absolutely nothing is worse than sitting out wind, rain, and or snow for days at a time in a flimsy leaking tent.

Nearly every tent, backpack, or rain jacket on the market today will perform well in adverse conditions, at least for their first season. What gear reviewers won’t tell you is how well they hold up after a few seasons of use!

  • Backpack

    A high-quality good fitting backpack is one of the most essential pieces of gear you’ll need for a successful and enjoyable backpacking trip.

    Pro Tip:   Forget that fancy expensive photo gear backpack. They are designed foremost to protect your camera and lenses while on the trial, everything else is secondary. You’ll quickly find that out when you’re several miles into a steep climb when that backpack has suddenly turned itself into a medieval torture device.

    Go with a pack specifically designed for backpacking. Use soft items in your pack, like clothes to protect your gear. Visit a reputable outdoor gear store and try on different packs. Speak with a knowledgeable salesperson about what you need, a good one will help choose and fit the ideal pack. Keep in mind that to accommodate all your photo gear you may need a larger pack than you initially think.

    Pro Tip:   Do not buy a backpack from an online retailer until you have already physically checked it out and tried it on! Ideally, borrow a friend’s for a short trip first to see if it works for you.

    My Gear: 
    Osprey Zenith 88 Osprey makes high-quality packs for every type of adventurer. This is the most comfortable pack I’ve ever used.  Its suspension system is much more comfortable for carrying heavier loads than its popular Aether 85. Perfect size for trips over three or four days in length. Although it is a bit on the large size for a weekend trip.

North Cascades backcountry campBackcountry camp North Cascades

  • Shelter

    A good shelter is the next most important piece of backpacking gear.

    If you’re traveling light and fast, and are only concerned about making miles in gorgeous summer weather without any flying insects to bother you, then even a thin nylon tarp will do.

    But it’s a different story when you’re out for a week and the weather turns sour, with mosquitoes, flies, and gnats out in biblical proportions. Then you’ll wish for something a bit more substantial to protect you and your camera gear.

Look for a lightweight tent with a silicone-treated rain fly. I also like a tent with a vestibule large enough to protect items you don’t want inside the tent. Like boots and a dirty backpack.

My Gear:
Big Agnes Copper Spur 2. Super lightweight, easy to pitch, with two doors and large vestibules. This tent also comes in a one-person size, but I like a little more elbow room.

  • Sleeping Bag and Pad

    For years I steered clear of down bags, mainly because  I felt they were a poor option in the rainy Pacific Northwest. However, now I’m an enthusiastic supporter of down. They’re like sleeping enveloped in a warm cloud. And they’re generally much lighter and more compressible than synthetic bags. A high-quality down sleeping bag is not cheap so look at it as an investment. However, with proper care, a well-made bag will last for many years. Feathered Friends and Western Mountaineering make some of the finest bags around.

    Sleeping pads are essential for keeping those roots from poking into your back while sleeping, or for insulation when camped on snow. Options here are either a foam pad or an inflatable. I’ve used Therm-a-Rest pads exclusively for many years. They are incredibly comfortable with adjustable firmness, are lightweight, and compress down very well.

    My Gear:
    Western Mountaineering Badger 
    Therm-a-rest Classic

Backcountry Camp North Cascades National Park Backpacking Photography Gear TipsNorth Cascades National Park

  • Stove

    Another essential item for any overnight trip. The days of preparing your meals over an open campfire are long gone. Campfires above timberline are banned just about everywhere, and for many good reasons. Besides, cooking over an open fire takes an long time and is messy and dangerous.

    The two options are liquid white gas (Coleman Fuel) and butane mix canisters. Canister stoves are all the rage right now and some are much better than others.  The biggest drawback with canister stoves is that they lose their power output in colder weather. You’ll need to keep the canisters warm for maximum performance.

    Liquid fuel stoves perform well at any temperature and do so to the last drop of fuel. For this reason, they are the better option for winter trips. They weigh only slightly more than canister stoves, and there are no empty canisters to dispose of. However, canisters can be recycled in some areas if prepared properly. Check with your local recycling facility for regulations.

    My Gear:
    MSR Reactor I recently switched from my trusty MSR XGK stove to the reactor, and so far I have been very pleased. This stove system with fuel canisters is lighter weight, and it boils water very quickly. However, one drawback is that in cold weather it is necessary to keep fuel canisters warm. Ideally, you can accomplish this by keeping them in your sleeping bag at night.

Titcomb Basin backcountry campWind River Range

  • Footwear

    Proper footwear is only second to a good backpack for comfort on the trail. There is a strong debate on leather boots vs lightweight trail runners. For years I’ve sworn by stiff leather boots with lugged soles. But on recent trips, I’ve gone with lighter-weight boots, and will probably move more toward trail runners shortly.

    Pro Tip:  Be aware that if you’re backpacking in the mountains early in the season lightweight shoes may not be the best option. Hiking in snow for only a few minutes will result in very wet cold feet. On steep snow slopes, you also won’t get much traction, and step-kicking will be very difficult.

  • Other Gear

    Here is a list of other necessary items. They’re all important, but I won’t go into detail about them since it would require a separate article.

    Weather appropriate clothing
    Cookware
    Water bottle or hydration bag
    Water filters or other purification methods
    Food, including trail snacks
    Map
    Headlamp
    Ten Essentials

Limestone Lakes Basin Height of the Rockies Provincial Park British ColumbiaHeight of the Rockies Provincial Park

In Conclusion

This should provide you with enough gear tips to begin planning for your next backpacking photography trip. As I mentioned many times in this article, cutting down on weight is important. But so is your comfort level. This isn’t a contest to see who can have the lightest pack and hike the farthest. So what if you choose a slightly beefier tent, or need to bring another lens? It’s your trip and you can always make adjustments to your preferences in the future.

Now get out there and have fun!

Also, check out these blog posts for hiking and backpacking, and photography destinations:
Mount Baker Wilderness Destinations
Hannegan Peak Ruth Mountain Mount Baker Wilderness
Lake Ann Ptarmigan Ridge Mount Baker Wilderness

Thanks for reading, feel free to share this post with your friends and colleagues! And make sure to check out my next post in this series: Backpacking Photography Tips

Backpacker on Titcomb Basin Trail Wind River Range Wyoming Backpacking Photography Gear TipsTitcomb Basin Wind River Range

If you found reading Backpacking Photography Gear Tips to be  enjoyable and informative please feel free to share it with friends and family

Ever wonder what it’s like photographing landscapes and nature for a living? Check out my blog post:
What is it like to be a Professional Landscape Photographer?

All photos appearing in Backpacking Photography Gear Tips are available for Commercial Licensing and Fine Art Prints

Want to learn more? Take your Creative Photography to the next level with  Private Instruction and Guided Photo Tours.

Backpacking Photography Gear Tips

Squaretop Mountain reflected in Green River, Bridger Wilderness, Wind River Range Wyoming

Green River Lakes Wind River Range

Green River Lakes Wind River Range

Squaretop Mountain reflected in Green River, Bridger Wilderness, Wind River Range WyomingSquaretop Mountain and Green River #67163  Purchase

At the North end of the Wind River Range is one of the most scenic and accessible areas in the Bridger Wilderness, Green River Lakes. The Winds are famous for its numerous trails winding through rugged subalpine terrain. Most of those trails start high and involve lengthy approaches to the most scenic areas. However, at Green River Lakes a hiker starts low and passes through a pleasant valley before climbing into the alpine.

Dominating the Green River Lakes landscape is Squaretop Mountain, one of the most iconic mountains in the state of Wyoming. Only Grand Teton in Grand Teton National Park is arguably more recognizable. Squaretop immediately comes into view at the end of the access road. And it remains the focal point for the first six or so miles along the Green River trail.

Square Top Mountain seen from Green River Lake Wind River Range WyomingGreen River Lakes Wind River Range #66979  Purchase

Following my nine-day backpacking trip to Island Lake and Titcomb Basin, this was to be my final destination in the Winds. After several lengthy backpacks over the past month, this last one would be short and easy.

The Green River Lakes trailhead is at the end of a 52-mile drive north from Pinedale. The last 21 miles are on a washboard gravel and dirt road. Adjacent to the large trailhead parking area is the Green River Lakes Campground, which has 39 sites. However, there are plenty of random camping sites available along the 21 miles of gravel road.

Squaretop Mountain Bridger Wilderness, Wind River Range WyomingSquaretop Mountain Wind River Range #66997  Purchase

Hiking the Green River Lakes/Highline Trail

The trailhead is the northern end of the Highline trail, which runs the length of the Wind River Range. It’s also the beginning, or end, of the increasingly popular Wind River Range High Route. The plan was to hike in only for the first five or six miles to the best views of Squaretop and Green River. At that location, I would set up camp and spend a few days photographing the area.

Starting at the north end of the larger of the two Green River Lakes, the trail follows the open eastern side of the lake. With only minor ups and downs, and unobstructed views the entire way, this section is very pleasant. After a couple of miles is a junction with the Clear Creek Trail and a large open area filled with gravel and willows. Then comes a short climb and the second Green River Lake is spread out just below. All of this makes for great hiking but the real treat is just ahead.

Soon after passing the southern end of the second lake, the trail begins to follow close to the twisting Green River. Its name is taken from the fact that the river is fed by glacial meltwater, coloring it an opaque green or turquoise. The Winds contain some large glaciers, located mainly on the east side of the Continental Divide. Although here on the west side of the range few are visible from trails. Being so far south in such a dry climate it is surprising to come across a glacier-fed river, similar in appearance to those seen further north in the Canadian Rockies.

Squaretop Mountain reflected in Green River, Bridger Wilderness, Wind River Range WyomingSquaretop Mountain and Green River #67170  Purchase

Along the Green River

This area, where the river runs slow among many bends, was where I needed to be, and I began to keep my eye out for a suitable campsite. Getting an early start once again paid off big time. Just above the most scenic point along the Green River, I found an unoccupied site. I considered myself very lucky in this respect since this was the Friday of Labor Day weekend. There were sure to be lots of parties looking for a site close by.

After setting up camp I walked down to the river and knew I was in the ideal spot. Along the river it was evident by the trampled grass that it was a prime viewing area. I’m guessing most of those spots were where other photographers or photo tours/workshops set up shop. The reason why it’s so popular is very clear. With the Green River in the foreground Squaretop Mountain looming in the background framed by fir and pine trees.

Squaretop Mountain reflected in Green River, Bridger Wilderness, Wind River Range WyomingSquaretop Mountain and Green River #67138  Purchase

After a day hike a couple of miles further up I decided that the best spot for photography was where I set up camp. Due to weather and lighting conditions, I ended up spending three nights here. Like my previous backpacks in the Winds this summer the weather was just too good. Every day was warm and sunny, perfect for just about any outdoor activity, but not for landscape photography.

The first two days were lacking suitable clouds and light during the morning and evening golden hours. During this time I was entertained by an otter swimming in the river and some moose grazing in the meadows on the opposite side. However, on the morning of my last day, some approaching weather helped make the wait worthwhile.

Bridger Wilderness boundary sign on Green River Lakes Trail, Wind River range WyomingBridger Wilderness Boundary Sign #67194  Purchase

Moving on to Grand Teton National Park

On  Monday morning it was time to pack up and hike out. My adventures in the Winds were finally coming to a close, and the next half of my Rocky Mountains photo tour was about to begin. Now that the busy Labor Day weekend was over it was safe to drive north into Grand Teton National Park. Little did I know at the time, but there were only a few more days of good weather left. Fall storms would soon be rolling in, bringing lots of rain and even some snow.

Sitting at my desk writing this post on a rainy winter day, I have fond memories of my month of backpacking in the Winds and Sawtooths. I truly hope I have the opportunity to return soon, there is so much more to see and explore!

If You Go to Green River Lakes

Distance from trailhead to river flats:  5 miles
Elevation Gain:  about 300′
Difficulty:  Easy
Red Tape:  As of 2019, no permits are needed

The Green River Lakes Trailhead is located 52 miles north of Pinedale, on the Green River Road. The last 21 miles are unpaved and can be rough in several places. Adjacent to the trailhead there is the Green River Lakes Campground, 39 sites $12 per night. This site doesn’t open until July 1. However, if the campground is closed there are plenty of free sites along the road.

Make sure you take along plenty of insect repellant. The Winds are especially notorious for their ravenous hordes of mosquitoes and flies. Although they weren’t too bad during my trip in mid-August. Also, be prepared for dramatic weather changes. I had great weather on my trip but the wind was brutal for several days.

The town of Pinedale makes a great base for multiple trips into the Winds. It has everything you’ll need, from good food and lodging to one of my favorite outdoor recreation stores, the Great Outdoor Shop. It’s stocked with everything needed for a successful trip, including a very knowledgeable and friendly staff. Don’t visit Pinedale without dropping in! Right next door to the great Outdoor Shop is the best place to go for a post-trip meal, the Wind River Brewing Company. They have excellent burgers and great brews!

Squaretop Mountain reflected in Green River, Bridger Wilderness, Wind River Range WyomingSquaretop Mountain and Green River #67130  Purchase

Leave No Trace

And now for a short lecture. As I’ve been saying in previous posts, don’t even think about visiting this or any other wilderness area unless you are prepared to strictly follow the guidelines of Leave No Trace (LNT). The Wind River Range and all other wilderness areas throughout the world are under incredible pressure from growing amounts of visitors. Please do your part to help preserve these precious areas for future generations!

To learn more about the principles and practicing LNT please take a few minutes to visit the Leave No Trace Center for Outdoor Ethics. Your children and grandchildren will thank you!

Seven Leave No Trace Principles

  • Plan ahead and prepare.                                       
  • Travel and camp on durable surfaces.                 
  • Dispose of waste properly.                                                                         
  • Leave what you find.                                            
  • Minimize campfire impacts (be careful with fire).
  • Respect wildlife.  
  • Be considerate of other visitors.

Photo Gear Used On This Trip

Nikon D850
Nikkor Lens:
14-24mm 2.8G ED
24-70mm 2.8E ED
70-200mm 2.8E FL ED
Gitzo 1532 Tripod
Really Right Stuff B-55 Ball Head
Assorted Lee Graduated Neutral Density Filters
B+H Polarizing Filter
Vello FWM-N2 Remote Shutter Release

If you enjoyed reading Green River Lakes Wind River Range please share it with your friends and family. And make sure you check out more posts on the Winds:

Cirque of the Towers Wind River Range
Central Wind River Range Backpacking
Bonneville Lakes Wind River Range
Island Lake Wind River Range
Titcomb Basin Wind River Range
Indian Basin Wind River Range
Pyramid and Shadow Lakes Wind River Range

All photos appearing in Green River Lakes Wind River Range are available for Commercial Licensing and Fine Art Prints. Click on any image to purchase, or contact me for more info!

Adult male backpacker with blue backpack and red shirt on the Fremont Trail near Dads Lake. Bridger Wilderness, Wind River Range WyomingOn the Highline Trail Wind River Range #66332  Purchase

Green River Lakes Wind River Range

Indian Basin wildflowers Wind River Range wyoming

Indian Basin Wind River Range

Indian Basin Wind River Range

Indian Basin wildflowers Wind River Range WyomingIndian Basin Wildflowers Wind River Range #66885  Purchase

In the Wind River Range of Wyoming lies Indian Basin, a rocky alpine area along the Continental Divide. Sitting at around 11,000′ Indian Basin shares the spotlight with the popular Island Lake and Titcomb Basin areas. Part of the Bridger Wilderness, these three areas are one of  the most sought after destinations for backcountry adventure in North America

Indian basin is less than three miles from campsites at Island Lake, making it an ideal day-hike. The trail to the basin extends all the way to Indian Pass, one of the few hiker accessible passes in the entire Wind River Range. Aside from sitting on the edge of the Continental Divide the pass also gives close views of the Knife Point Glacier. This entire area is also part of the popular Wind River Range High Route. The High Route is a mostly off-trail 80+ mile hike that follows the length of the range.

On my 2002 trip to Island Lake, I didn’t have time to check out this fabulous area. The one extra day I had I used to day-hike into Titcomb Basin instead. On this trip, Indian Basin was definitely part of my itinerary.

Indian Basin Wind River Range WyomingTent in Indian Basin Wind River Range #66807  Purchase

Hiking into Indian Basin

Having already spent several days at Island Lake and Titcomb Basin I was ready to move on to new terrain. Earlier in the day I broke camp in upper Titcomb Basin and made my way south to the trail junction for Indian Basin. By the time I reached the junction alongside a swift-flowing stream, the wind was again picking up. I only had about two miles and 400′ elevation gain left to make the basin, but it was a tough stretch for me.

By this time I had been backpacking in the Winds and Idaho’s Sawtooth Mountains for around 25 days. I could easily say I was in very good physical condition. However, on all these trips I neglected to pay close enough attention to one very important thing, my diet. Trying to save weight on long backpacking trips is always a priority. And with my pack heavily weighed down with camera gear food was the easiest target for weight reduction.

Indian Basin backcountry camp, Harrower Peak is in the distance, Bridger Wilderness, Wind River Range WyomingIndian Basin Camp Wind River Range #66822  Purchase

It didn’t take a nutrition expert to see that my meals contained mostly carbohydrates. There was next to no fat and very little protein present in my food. Although I always carry vitamin supplements, I believe it was the lack of adequate protein that took a toll on me. This was painfully evident as I climbed up to the basin.

The last mile or so traverses and switchbacks steeply to a ridge above the basin. It was also here that the wind really began to pick up. Every step would result in clouds of dust whipping up in front of me. At several points the wind was so strong it almost knocked me over, even with a full pack! Finally, at the top of the ridge, I looked down into the rocky basin. As if to hurry me on, an especially strong gust pushed me forward and down to my goal.

Indian Basin wildflowers Wind River Range wyomingIndian Basin Wildflowers Wind River Range #66912  Purchase

Camping in Indian Basin

There was about 100′ to descend from the ridge and I immediately scouted the terrain for a suitable campsite, preferably sheltered from the wind. Towards the bottom near a lake outlet, I came across several beautiful fields of wildflowers. They certainly looked out of place in such a barren environment, but they would make great subject matter for photos.

Indian Basin contains three main lakes and several small tarns, guarded over by Fremont, Jackson, and Harrower peaks. As a testament to past glacial activity, the bedrock of the entire basin exhibits extensive scouring and polishing by glaciers. It was easy to envision the entire basin buried under a massive glacier spilling into Island Lake below.

Just above the largest lake, I found a good campsite sheltered from the wind by a granite wall. Throughout the day I saw a few climbing parties setting up a basecamp on the opposite side of the lake. Late in the day a couple arrived and began to search for a good site. It was apparent that they were fatigued from the hike and constant wind. I guessed that from the fact that they set up their tent in the first available level spot, which unfortunately offered no shelter from the wind. It looked like their tent would not survive the night.

Indian Basin wildflowers Wind River Range wyomingIndian Basin Wildflowers Wind River Range #66893  Purchase

Poor Light and Hi-Tech Discoveries

There were some promising-looking clouds earlier in the day, but they vanished by evening. The result was an empty sky with little to no chance of good light during the golden hour. However, I dutifully went out and did my best to take some photos. Of course, the fields of wildflowers I saw earlier were my prime subject matter. With landscape photography opportunities limited, recreation photography filled its place. Once again I used the campsite and myself as stock photo subject matter.

The next day I took to wandering around the basin to look for more subject matter. Unfortunately throughout the day and evening lighting conditions were still pretty bland. While scouting around on a high granite knoll I came across an unlikely piece of trash. At first, I thought it was some sort of packaging, but it turned out to be a solar charger.

Backpacker in Indian Basin Wind River Range WyomingIndian Basin Camp Wind River Range #66863  Purchase

Either the charger fell out of someone’s pack or was forgotten. Whatever the reason it was sitting there for at least one full year. The exterior was weather-beaten and fading. Also, some of the wires had evidence of small critters chewing on them. I took it back to camp and hooked it up to my iPhone to see if it still worked. Using a bandaid to tape the chewed wires worked, but just barely.

The next morning it was time to leave. I only had enough supplies left for one last night at Island Lake before the hike out. My one regret while staying at Indian Basin was that I didn’t attempt to hike up to Indian Pass. At the time I was tiring from a long trip and bummed at the lack of good light for pictures. So I foolishly decided to blow it off. Sitting here now writing this post I’m kicking myself for not checking out the pass.

Alpenglow over backcountry camp with illuminated tent in Indian Basin, Harrower Peak is in the distance, Bridger Wilderness, Wind River Range WyomingAlpenglow over Indian Basin Camp Wind River Range #66949 Purchase

Last Night at Island Lake and Hiking Out

Hiking out of Indian Basin I came across one of the climbing parties I saw a few days earlier. They had attempted to reach the summit of Fremont Peak, which sits at 13,745′. The main route to the summit is a long steep hike followed by a scramble, although there are also other technical routes. I spoke with the leader of the party and was informed that extremely high winds and cold turned back them back short of their goal.

Arriving at Island Lake I once again opted to set up my last camp on the granite knoll above the lake. I spent the rest of the day watching the activity at the camps below. It was a bit sad that several days ago I just arrived here at the start of the trip, and now it was nearly over. As a fitting finale, I set up my tripod for a last panoramic shot of the scene. This time I would do a night shot with the Milky Way over the Continental Divide.

Milky way over Island Lake Wind River Range WyomingMilky Way and Andromeda Galaxy over Island Lake #66970  Purchase

The next day it was time to pack up for the long hike out. It went fast and easy, my pack was much lighter since most of my fuel and food was used up. After recognizing my nutrition problem the other day I planned accordingly. I saved the food packets with the highest amount of protein ingredients for dinner and breakfast. It must have worked since the hike out was a snap.

With spirits high from a wonderfully successful trip I made my way down the trail, but not before one last gaze on Island Lake and the great peaks. Of course, it was lots of fun stopping along the trail to chat with hikers and climbers just beginning their adventure.

Rewards of a Backpacking Adventure

When I arrived back at my truck at the trailhead I had a quick tailgate shower and put on some clean clothes. My next stop was the Wind River Brewing Company, where I enjoyed a big burger and a tall cold glass of IPA. Then I did something I had never done in my past 35 years of photography trips, I checked into a motel to enjoy a hot shower and soft bed!

The next day was spent driving to the trailhead of my final Wind River Range backpacking destination, Green River Lakes.

Backpacker in Indian Basin Wind River Range WyomingIndian Basin Camp Wind River Range #66825  Purchase

If You Go to Indian Basin

Distance from Island Lake:  3 miles
Elevation Gain:  about 300′ from Island Lake into the basin
Difficulty:  Easy
Red Tape:  As of 2019, no permits are needed

Totals for my nine-day trip including side trips and photo scouting
Distance: 44 miles
Elevation: 5800″

The Elkhart Park Trailhead is located at the end of Skyline Drive, an excellent paved road 15 miles east of Pinedale. About a mile before the road ends there is a viewpoint with dramatic views of the range and the gorge below. Adjacent to the trailhead there is a small campground. The few good sites here are almost always taken.

Make sure you take along plenty of insect repellant. The Winds are notorious for its ravenous hordes of mosquitoes and flies. Although they weren’t too bad during my trip in mid-August. Also, be prepared for dramatic weather changes. I had great weather on my trip but the wind was brutal for several days.

The town of Pinedale makes a great base for multiple trips into the Winds. It has everything you’ll need, from good food and lodging to one of my favorite outdoor recreation stores, the Great Outdoor Shop. It’s stocked with everything needed for a successful trip, including a very knowledgeable and friendly staff. Don’t visit Pinedale without dropping in! Right next door to the great Outdoor Shop is the best place to go for a post-trip meal, the Wind River Brewing Company. They have excellent burgers and great brews!

Island Lake and Fremont Peak, Bridger Wilderness, Wind River Range WyomingIsland Lake Wind River Range #66371  Purchase

Leave No Trace

And now for a short lecture. As I’ve been saying in previous posts, don’t even think about visiting this or any other wilderness area unless you are prepared to strictly follow the guidelines of Leave No Trace (LNT). The Wind River Range and all other wilderness areas throughout the world are under incredible pressure from growing amounts of visitors. Please do your part to help preserve these precious areas for future generations!

To learn more about the principles and practicing LNT please take a few minutes to visit the Leave No Trace Center for Outdoor Ethics. Your children and grandchildren will thank you!

Seven Leave No Trace Principles

  • Plan ahead and prepare.                                       
  • Travel and camp on durable surfaces.                 
  • Dispose of waste properly.                                                                         
  • Leave what you find.                                            
  • Minimize campfire impacts (be careful with fire).
  • Respect wildlife.  
  • Be considerate of other visitors.

Photo Gear Used On This Trip

Nikon D850
Nikkor Lens:
14-24mm 2.8G ED
24-70mm 2.8E ED
70-200mm 2.8E FL ED
Gitzo 1532 Tripod
Really Right Stuff B-55 Ball Head
Assorted Lee Graduated Neutral Density Filters
B+H Polarizing Filter
Vello FWM-N2 Remote Shutter Release

If you enjoyed reading Indian Basin Wind River Range please share it with your friends and family.

And check out these other Wind River posts!
Cirque of the Towers Wind River Range
Bonneville Lakes Wind River Range
Island Lake Wind River Range

Titcomb Basin Wind River Range
Green River lakes Wind River Range
Central Wind River Range Backpacking
Pyramid and Shadow Lakes Wind River Range

All photos appearing in Indian Basin Wind River Range are available for Commercial Licensing and Fine Art Prints. Click on any image to purchase, or contact me for more info!

Milky way over Wind River Range wyomingMilky Way and Andromeda Galaxy over Indian Basin #66970  Purchase

Indian Basin Wind River Range

Titcomb Basin, Bridger Wilderness, Wind River Range Wyoming

Titcomb Basin Backpacking Wind River Range

Titcomb Basin Backpacking Wind River Range

Titcomb Basin, Bridger Wilderness, Wind River Range WyomingTitcomb Basin, Wind River Range #66582  Purchase

The Wind River Range of Wyoming is a place that nearly every backcountry enthusiast dreams of visiting. Few places in North America are as staggeringly beautiful as Titcomb Basin and Island Lake. Both areas, located just west of the Continental Divide, are rich in outstanding scenery and recreation opportunities. Whether you’re here for backpacking, mountaineering, climbing, fishing, or photography, this is the place to experience it all.

In the previous post, I detailed the first section of my nine-day trip, from the trailhead to Island Lake. Now it’s time to move on to the next destination, Titcomb Basin. First I should explain the odd name. Titcomb Basin, Titcomb Lakes, and the Titcomb Needles bear the names of Charles and Harold Titcomb. Although mountain men certainly were in the area in the early 19th century, these two brothers were among the first white men to officially visit the area. While there they made assents to some of the surrounding peaks.

Titcomb Basin Trail, Bridger Wilderness, Wind River Range WyomingTitcomb Basin Trail #66613  Purchase

Depending on which source you reference, Titcomb Basin begins at the narrow exit of the lower lake or is limited to the boulder-strewn alpine basin beyond the upper lake. For my part, I consider it the former. In either case, Titcomb Basin is a narrow treeless alpine valley about six-mile-long. On three sides granite peaks rise to 3000′ above its floor. Occupying most of the basin are two large lakes. A third lake, called Mistake Lake, sits in an unlikely spot, hidden several hundred feet higher on a rocky shelf below Fremont Peak. At the north end of the basin lie some of the most imposing peaks of the entire Wind River Range. Twin Peaks, Mount Woodrow Wilson, The Sphinx, Dinwoody Peak, and Mount Helen are all over 13,000′.

 Titcomb Basin Backpacker Wind River Range WyomingBackpacking into Titcomb Basin #66780 Purchase

Hiking Into Titcomb Basin 

In the morning along the shore of Island Lake, I began breaking camp and stuffing my pack, eagerly anticipating the day ahead. It was another beautiful August day and I was about to finally return to Titcomb Basin. Back in 2002 I spent a few days at Island Lake but was only able to make a day-hike visit to the basin. Since then I made sure that my next trip would have more time for exploration. On this trip, I would have at least two full days for wandering and photographing its beauty.

The hike begins with the trail navigating around the southeast end of Island Lake. In contrast to rocky shores on the rest of Island Lake, and all the previous lakes, this part has a wonderful broad golden sand beach. Soon after the trail leaves the lake and begins to climb past small waterfalls into wide meadows. Alongside a creek crossing is a junction with a trail heading up to Indian Basin and Indian Pass. This area is also on my itinerary, but I’ll visit it on the way out of Titcomb Basin.

Titcomb Basin, Bridger Wilderness, Wind River Range WyomingTitcomb Basin, Wind River Range #66582  Purchase

Shortly after the junction, the trail approaches Lower Titcomb Lake’s rushing creek outlet. To get by it makes a tight squeeze along a rock wall. On the other side of the wall, the view opens wide onto a most unforgettable scene. Here the trail winds its way through grassy meadows into a rugged landscape of massive peaks and lakes. It’s apparent that many hikers, in awe of the scene, have paused here to take it all in. To see it in pictures is one thing, but to stand there in person, feel the breeze on your face, and take in the sounds and smells is something that makes you feel incredibly alive!

Lower Titcomb Lake

I planned to find a campsite somewhere along the lower lake before moving into the basin beyond the upper lake. This was a bit easier said than done. Between the lake and the base of Fremont Peak is a narrow strip of land that doesn’t offer many level spots to set up camp. I was also mindful of regulations requiring camps to be a certain distance from lakes, streams, and trails. Also, I certainly didn’t want to be one of those that set up camp on a pristine meadow.

After about an hour of wandering around and checking out all the nooks and crannies. I found a spot out of sight of the trail on bare gravel, not ideal but sufficient. While scouting for a site I came across some photogenic groupings of wildflowers to work with later in the day.

Titcomb Basin wildflowers Wind River Range WyomingTitcomb Basin Wildflowers #66559  Purchase

As the day wore on clouds closed in and the sky became gray. Nevertheless, I still had to thoroughly check out the immediate area for evening photo compositions. One place I was eager to see was the terrain on the opposite side of the lake. There was a narrow channel in the lake just a little too wide to hop over. In it were some deep spots with a swift current which gave me pause to consider. It wouldn’t have been a big deal if I didn’t have expensive camera gear. However, at the time it didn’t look like it was worth taking the chance.

In addition to the aforementioned wildflowers, about a half-mile up the trail was an area of grassy wetlands along the lake. The winding channels and grassy hummocks made for perfect foreground elements to the backdrop of Fremont Peak. With several ideal spots lined up all I had to do was pray for good light. I found a suitable trailside boulder to relax on and kept a close watch on the sky.

Hiker in Titcomb Basin Wind River Range WyomingEnjoying the view #66543  Purchase

Titcomb Basin, Bridger Wilderness, Wind River Range WyomingFremont Peak from Lower Titcomb Lake 66567  Purchase

Evening Light At Lower Titcomb Lake

For a while it was looking like the evening would be a bust, there were a few breaks in the clouds but they soon closed up. Just before sunset, I was about to throw up my hands in the air with exasperation when the sky began to open up. Only a few sun rays made it through at first as I rushed back to the patch of wildflowers. Earlier on I had previsualized this scene, so it was short order to set it up and photograph it.

Soon it became apparent that something special was happening. After photographing the wildflowers I rushed over to the lakeshore to look for compositions of rocks and lake reflections. The light was getting better and better, and by this time I was in overdrive. From years of experience, I knew that the light could continue to get better or shut off completely at any moment. So there was no time to lose.

Titcomb Basin Wind River Range WyomingTitcomb Basin Wind River Range 66567  Purchase

I didn’t forget the area of grassy wetlands, so I began to run like a madman to get to them in time. As I arrived the summit of Fremont Peak was glowing red, a sure indication that there were only a few minutes left before sunset. This was a great spot and I wished I had more time to explore the possibilities for compositions. However, unless there were some exceptional sunrise conditions these wetlands would be best photographed in the evening.

Titcomb Basin backcountry camp Wind River Range WyomingCampsite in Titcomb Basin #66593  Purchase

Titcomb Basin backcountry camp Wind River Range WyomingCampsite in Titcomb Basin #66599  Purchase

Back at camp, I kept photographing, this time working with the night sky and an illuminated tent. In the morning there was a brief bit of nice light as the sun rose. Once again my campsite became the subject matter.

Upper Titcomb Basin

The next morning I broke camp and began the short hike into the upper basin. The entire length of Titcomb Basin is easy pleasant hiking, the trail is always along the lakes and has next to no ups and downs. Once the trail goes beyond the upper lake it begins to fade out, although route finding is very straightforward. From here you enter a vast basin filled with rocks, boulders of every size, large glacier polished slabs, and rushing streams. The vegetation is confined to small patches of flower-filled meadows. The further you go the more barren it becomes.

Titcomb Basin backcountry camp, Bridger Wilderness, Wind River Range WyomingCamp in Upper Titcomb Basin #66635  Purchase

I found an ideal campsite about a half-mile beyond the upper lake. Set near a large stream it was clearly used many times in the past. It was also obvious that this is an area that routinely experiences high winds since there were stone walls built as windscreens. It was breezy most of the day, but later that night I had a real taste of those winds.

Bonney Peak and Mount Helen, Bridger Wilderness, Wind River Range WyomingBonney Peak (L) and Mount Helen Wind River Range #66641  Purchase

The Alpine Basins

In the afternoon I went out to explore the terrain further up in the basin. This is the area where many climbers and mountaineers set up a base camp. Bonney Pass in the east part of the upper basin is the preferred route for a climbing approach to Gannett Peak, the highest point in Wyoming. This is also an area that is traversed by hikers and mountaineers doing the 80+ mile long Wind River Range High Route.

Since I’m not a mountaineer and traveling solo I looked for an easy route to higher ground. I found a boulder-filled slope veering west which ultimately led me to the base of Twins Glacier. This was truly an alpine environment, only rock and ice made up the view in every direction.

Upper Titcomb Basin, Bridger Wilderness, Wind River Range WyomingBighorn Sheep near Twin Glacier #66636 Purchase

As I navigated among the boulders I spotted a herd of Rocky Mountain Bighorn Sheep a short way off. They all had the appearance of being either females or yearlings. Their activity revolved around a big boulder and some muddy ground, which led me to believe some sort of mineral lick was present. Of course, they all saw me while I was still a long way off and easily moved higher up and out of harm’s way. Aside from a few birds and ground squirrels, this was the most significant amount of wildlife I came across since leaving home. The day was wearing on so I reluctantly made my way back down to camp.

Mount Helen and field of purple Asters growing in Upper Titcomb Basin, Bridger Wilderness, Wind River Range WyomingTitcomb Basin wildflowers Wind River Range #66700  Purchase

Wind and Stars in Upper Titcomb Basin

Back at camp, I began to line up photo compositions. My prime subject matter was several large groupings of purple asters, using Mount Helen as a backdrop. The meltwater creek was another source of compositions. But it was difficult to get the best angles without having to stand in the middle of the stream and not lose footing on the slippery slabs.

The golden hour light wasn’t as dramatic as the previous evening. However, there were a few wispy clouds present to aid in composition. Part of the difficulties in photographing Titcomb Basin is its high walls and narrow width. Meaning that during both morning and evening the majority of the basin will be in shadow. Only the upper halves of the peaks will receive warm light during the golden hours.

Mount Helen Titcomb Basin Wind River Range WyomingUpper Titcomb Basin Wind River Range #66695  Purchase

After sunset, I began work on some evening shots. First I made some long exposures of camp. But my main goal was to do some Milky Way photography. I set up my tripod looking south where the bulk of the Milky Way would cross diagonally across the sky. As I waited for the sky to become sufficiently dark the air was mostly calm with a few brief gusts of wind. Around 11:00 the Milky Way was out and I began to work. Towards the horizon, a few wispy clouds still had a bit of illumination to them which I brought out in post-processing.

Titcomb Basin backcountry camp Wind River Range WyomingCamp in Upper Titcomb Basin #66635  Purchase

I made several exposures and left the tripod set up for pre-dawn shots. That was a mistake since sometime during the night it was blown over by the wind. After midnight the wind picked up in earnest. Periods of dead calm were broken by severe gusts which made the tent fabric snap like gunshots. Needless to say, I didn’t get much sleep!

Milky Way over Upper Titcomb Basin, Bridger Wilderness, Wind River Range WyomingMilky Way over Upper Titcomb Basin #66741  Purchase

Leaving Titcomb Basin for Indian Basin

In the morning it was still fairly windy, which made tearing down the tent a bit of a challenge. Again it was difficult to decide if I should stay an extra day, or move on. Food and fuel supplies were limited and I wanted to stay a couple of nights in Indian Basin, which was still new to me. Also, I planned to spend the last night at Island Lake before the final hike out.

Titcomb Basin wildflowers Wind River Range WyomingTitcomb Basin Wildflowers #66766  Purchase

In the end, the empty blue sky decided for me, and I decided to move on to Indian Basin. The weather for the rest of the trip was mostly sunny with clear skies, so staying an extra day in Titcomb Basin would’ve been mostly fruitless from a photographic standpoint.

Making my way back down along the lakes I paused to photograph some yellow arnica flowers, which I made a note of on the way in. I also made an extended stop at the entrance to the basin. It would mark my last view of Titcomb Basin until I hopefully returned sometime in the future. It was also a good spot to take some selfie hiking shots. Both for posterity and to use as stock imagery.

Backpacker on Titcomb Basin Trail Wind River Range WyomingLast view of Titcomb Basin #66804  Purchase

I sat a little while longer to take in the scene, then shouldered my pack and continued to Indian Basin. That final segment of this trip will be in my next post, Indian Basin Wind River Range.

If You Go to Titcomb Basin

Distance from Island Lake to Upper Titcomb Basin:  ~6 miles
Elevation:  ~300 gain from Island Lake to Upper Titcomb Lake
Highpoint 11,500′ at Twins Glacier area
Difficulty:  Easy
Red Tape:  As of 2019, no permits are needed

Totals for my nine-day trip including side trips and photo scouting
Distance: 44 miles
Elevation: 5800″

The Elkhart Park Trailhead is located at the end of Skyline Drive, an excellent paved road 15 miles east of Pinedale. About a mile before the road ends there is a viewpoint with dramatic views of the range and the gorge below. Adjacent to the trailhead there is a small campground. The few good sites here are almost always taken.

Make sure you take along plenty of insect repellant. The Winds are notorious for its ravenous hordes of mosquitoes and flies. Although they weren’t too bad during my trip in mid-August. Also, be prepared for dramatic weather changes. I had great weather on my trip but the wind was brutal for several days.

The town of Pinedale makes a great base for multiple trips into the Winds. It has everything you’ll need, from good food and lodging to one of my favorite outdoor recreation stores, the Great Outdoor Shop. It’s stocked with everything needed for a successful trip, including a very knowledgeable and friendly staff. Don’t visit Pinedale without dropping in! Right next door to the great Outdoor Shop is the best place to go for a post-trip meal, the Wind River Brewing Company. They have excellent burgers and great brews!

Titcomb Basin Wind River Range WyomingTitcomb Basin Wind River Range 66580  Purchase

Leave No Trace

Please Please Please!  Don’t plan a trip to this or any other wilderness area unless you are prepared to strictly follow the guidelines of Leave No Trace (LNT). The Wind River Range and all other wilderness areas throughout the world are under incredible pressure from growing amounts of visitors. Please do your part to help preserve these precious areas for future generations!

To learn more about the principles and practicing LNT please take a few minutes to visit the Leave No Trace Center for Outdoor Ethics. Your children and grandchildren will thank you!

Seven Leave No Trace Principles

  • Plan ahead and prepare.                                       
  • Travel and camp on durable surfaces.                 
  • Dispose of waste properly.                                                                         
  • Leave what you find.                                            
  • Minimize campfire impacts (be careful with fire).
  • Respect wildlife.  
  • Be considerate of other visitors.

Photo Gear Used On This Trip

Nikon D850
Nikkor Lens:
14-24mm 2.8G ED
24-70mm 2.8E ED
70-200mm 2.8E FL ED
Gitzo 1532 Tripod
Really Right Stuff B-55 Ball Head
Assorted Lee Graduated Neutral Density Filters
B+H Polarizing Filter
Vello FWM-N2 Remote Shutter Release

If you enjoyed reading Titcomb Basin Wind River Range please share it with your friends and family. 

And check out these other Wind River posts!
Cirque of the Towers Wind River Range
Bonneville Lakes Wind River Range
Titcomb Basin Wind River Range

Indian Basin Wind River Range
Green River Lakes Wind River Range
Central Wind River Range Backpacking
Pyramid and Shadow Lakes Wind River Range

All photos appearing in Titcomb Basin Wind River Range are available for Commercial Licensing and Fine Art Prints. Click on any image to purchase, or contact me for more info!

Milky Way over Upper Titcomb Basin, Bridger Wilderness, Wind River Range WyomingMilky Way over Upper Titcomb Basin #66743  Purchase

Titcomb Basin Backpacking Wind River Range

Island Lake Wind River Range Wyoming

Island Lake Wind River Range

Island Lake Wind River Range

Island Lake Wind River Range Wyoming Titcomb Basin Island Lake Part 1Island Lake, Wind River Range #66377  Purchase

In the north-central portion of Wyoming’s Wind River Range lies one of the most popular backpacking destinations in the lower 48, Island Lake and Titcomb Basin These areas represent the essence of the Winds, and for good reason. A well-maintained trail leads to breathtaking scenery, filled with beautiful lakes, meadows, and some of the highest peaks in the state of Wyoming. Whether you’re here for fishing, climbing, cross country exploring, or photography it has it all. In addition, the trailhead is one of the most easily accessed in the range. Elkhart Park Trailhead, at about 9300′, is only 15 miles on a paved road from the basecamp town of Pinedale.

Upon completing my trip to Bonneville Basin, this was to be my next and most important destination of the Rocky Mountains Photo Tour. The three backpacking trips in Idaho’s Sawtooth Mountains and Bonneville Basin were all warm-ups leading to the main event. My previous, and only, trip to Island Lake and Titcomb Basin was back in 2002. Since then a return trip has always been on my mind. This time I planned to go all out, allotting 10 days total,  ample time for photographing the area.

Bridger Wilderness Pole Creek trail sign WyomingPole Creek Trail Bridger Wilderness #66973  Purchase

After spending a few days resting up and restocking on supplies in Pinedale,  I drove to the Elkhart Park Trailhead and settled in for the night. I wanted to leisurely sort through all my gear and have it organized and ready for an early morning start. Like the Big Sandy Trailhead in the southern Winds, the Elkhart trailhead was overflowing with vehicles. However, parking wasn’t much of a problem since cars were coming and going throughout the day.

Horse packing Bridger Wilderness WyomingHorse packers Wind River Range #66965  Purchase

Hiking the Pole Creek Trail to Island Lake

Getting a start just after sunrise I hoisted my pack and hit the Pole Creek Trail. There are numerous trails and intersections on this trip, with the Pole Creek Trail occupying the first 6 miles. This first segment is a long very gradual climb through the pine forest. The monotony here is broken by the constant dodging of endless piles of horse manure. Aside from hikers, you’ll be sharing the next 12 or so miles with horse packers.

Photographers Point, Bridger Wilderness Wyoming Titcomb Basin Island Lake Part 1View from Photographer’s Point #66345  Purchase

After the first four miles in the forest, the trail begins to enter several meadows. At about five miles you reach the first milestone, Photographer’s Point. For most, Photographer’s Point at 10,400′,  is a mandatory resting place at the beginning or end of a trip. It’s also a turnaround destination for day-hikers. Going in, this is the first real wide-open view of the rugged terrain which you’re hiking into. From a deep yawning canyon to the great peaks on the Continental Divide, it’s an awesome unforgettable scene. Gazing upon this chaotic landscape you’ll wonder how in the world your trail will navigate through it.

The next five miles will rudely answer that question. You’re probably thinking that since Photographer’s Point is so high the rest of the trail will be in open subalpine terrain. Wrong. The trail soon gradually descends to Eklund Lake and begins a constant roller coaster of a hike. Fortunately, you’ll be passing numerous pretty lakes and small meadows along the way, which will help alleviate all the ups and downs.

Seneca Lake Bridger Wilderness, Wind River Range WyomingSeneca Lake, Wind River Range #66350  Purchase

Seneca Lake

The next major milestone and my first night’s destination is Seneca Lake.  However, before you reach this large scenic lake the trail quickly dips to its lowest point, around 9800′. Then it mercilessly climbs back up to around 10,300′ in half a mile. Towards the end of the first day with a fully loaded multi-day pack, this stretch is no fun!

At the end of the switchbacks on a low ridge is the reward for all your hard work.  Spread out before you is a shimmering blue lake set in a cliff-bound bowl. Beyond which are the peaks first seen at Photographer’s Point, although now they are much closer. From here to the far end of Seneca Lake the trail scenically winds its way just above the water.

Island Lake Trail Wind River Range WyomingThe trail to Island Lake, Wind River Range #66351  Purchase

Although Island Lake is only a little more than two miles further, Seneca Lake makes a good end to the first day for a couple of reasons. For one, the first day of a long trip is often the most difficult, due to a fully loaded pack. Secondly, and perhaps more importantly, is the availability of campsites at Island Lake. For the average hiker getting to Island Lake in one day will mean arriving in mid to late afternoon. Since this is the number one destination for nearly every party, most campsites will be occupied long before you get there.

Camping at Seneca Lake on the first night will allow for an early arrival at Island Lake, when some of the best sites may soon be vacated. At the far north end of Seneca, there are several campsites tucked away among the rocks. With a bit of difficulty, I was able to find a marginal site, although with little shade from the hot sun. But it fit the bill for my needs.

Island Lake Wind River Range WyomingIsland Lake Wind River Range #66366  Purchase

Above Island Lake

The next morning I broke camp to hike the final miles to Island Lake and encountered another reason to save this segment for the second day. The final two miles have a couple more fatiguing elevation gains and losses to overcome. Finally, at the summit of the last small pass comes the long-awaited view. Only a few hundred feet below lies a sprawling lake dotted with small islands and coves. Beyond are the towering ramparts of the Continental Divide, dominated by Fremont and Jackson Peaks, both reaching heights of over 13,000′.

On my first trip to Island Lake, I went on to find a site below the pass near the lake. This time I took a left at the pass to look for a site higher up with a panoramic view of the scene. It was a relief to find the small granite summit free of other campers. There is really only one decent level spot here for a tent, which meant I had the whole place to myself. The only drawback was the lack of water, so I had to settle for a small snowfield near the pass.

Island Lake and Fremont Peak, Bridger Wilderness, Wind River Range Wyoming Titcomb Basin Island Lake Part 1Island Lake Wind River Range #66386  Purchase

Several yards further from my tent was a great spot with unobstructed views of the entire basin. It was still only around nine in the morning so all I had to do was enjoy the view and wait for some good light. I spent most of the day observing activities below at the lake. Since I would be moving down there the next day I was able to clearly see where the best sites were.

Later, in the evening, the clouds and light I had hoped and prayed for arrived. I was kept busy photographing the scene as the light changed light until it finally faded just after sunset.

Island Lake sunrise Bridger Wilderness, Wind River Range WyomingIsland Lake Sunrise Wind River Range #66404  Purchase

Moving Down to Island Lake 

The next morning I woke early to set up my gear again. At first, it was looking like a gray dawn, but then the rising sun lit up the clouds in warm hues of red, orange, and yellow. A real treat, and a good start to the trip. After photographing I planned to move camp down to one of the sites near the lake.

At this point, I should mention that there are strict camping regulations in place throughout the Bridger Wilderness. Starting at the trailhead there are numerous signs stating that camping is prohibited within 200′ of any lake or trail. Also, fires are prohibited at or above the timberline.

As I previously mentioned, Island Lake is one of the most heavily used areas in the Winds. So besides observing all regulations it should only be common sense to tread lightly here and respect the privacy of other campers. Most parties I observed were following those rules. However, as always, there were a couple of parties that just had to camp on the meadows and build a campfire. Overall I found the lake area to be in good condition despite the amount of use it gets. I didn’t see any litter or trash, or worse, used toilet paper. I’m guessing the Forest Service and volunteers are stepping up on maintenance activities.

Fremont Peak reflected in Island Lake Wind River Range WyomingFremont Peak reflected in Island Lake #66413  Purchase

Photographing at Island Lake

The plan was to spend the day scouting around the lake for photo ops. This is certainly one area where just about every footstep will yield another great composition. The numerous bays, rocks, and islands make for great photographic potential. And with good light and a mirror-calm lake, everything is in place for portfolio-quality images.

Unfortunately, there was only a short time in mid-morning to create any decent images. Clouds were moving in and the rest of the day and the next morning were gray and overcast. However, I was able to make some nice photos while the lake was calm with a few wispy clouds in the sky. I was imagining how wonderful they would look in golden hour light. At least now I have another reason to return in the future!

Fremont Peak reflected in Island Lake, Bridger Wilderness, Wind River Range WyomingFremont Peak reflected in Island Lake #66408  Purchase

Moving on to Titcomb Basin

Unfortunately for me, there was only a short time in mid-morning to create any decent images. Clouds were moving in and the rest of the day and the next morning were gray and overcast. So a decision was in order, stay an extra day at Island Lake, or move on to Titcomb Basin? Rolling the dice and staying an extra day would mean one less day available to photograph in Titcomb Basin and Indian Basin. Both of these areas offered lots of new photographic potential, and I was planning to spend as much time there as possible.

Since I already had good photo success the previous evening and morning, I decided to move on to Titcomb basin the next day. There was always the possibility of spending another night at Island Lake on the way out. But that story will have to wait for Titcomb Basin Island Lake Part 2.

Peaks of Titcomb Basin and Island Lake Bridger Wilderness, Wind River Range WyomingPeaks of Titcomb Basin and Island Lake #66379  Purchase

If You Go to Island Lake

Distance to Island Lake:  12 miles
Elevation:  Trailhead 9300′, Island Lake 10,400′, trail high point 10,600′
About 2600′ gain and 1600′ loss along the length of the trail.
Difficulty:  Easy hiking but strenuous due to length and elevation changes
Red Tape:  As of 2019, no permits are needed

Totals for my nine-day trip including side trips and photo scouting
Distance: 44 miles
Elevation: 5800″

The Elkhart Park Trailhead is located at the end of Skyline Drive, an excellent paved road 15 miles east of Pinedale. About a mile before the road ends there is a viewpoint with dramatic views of the range and the gorge below. Adjacent to the trailhead there is a small campground. The few good sites here are almost always taken.

Make sure you take along plenty of insect repellant. The Winds are notorious for its ravenous hordes of mosquitoes and flies. Although they weren’t too bad during my trip in mid-August. Also, be prepared for dramatic weather changes. I had great weather on my trip but the wind was brutal for several days.

The town of Pinedale makes a great base for multiple trips into the Winds. It has everything you’ll need, from good food and lodging to one of my favorite outdoor recreation stores, the Great Outdoor Shop. It’s stocked with everything needed for a successful trip, including a very knowledgeable and friendly staff. Don’t visit Pinedale without dropping in! Right next door to the great Outdoor Shop is the best place to go for a post-trip meal, the Wind River Brewing Company. They have excellent burgers and great brews!

Island Lake and Fremont Peak, Bridger Wilderness, Wind River Range WyomingIsland Lake Wind River Range #66368  Purchase

Leave No Trace

And now for a short lecture. As I’ve been saying in previous posts, don’t even think about visiting this or any other wilderness area unless you are prepared to strictly follow the guidelines of Leave No Trace (LNT). The Wind River Range and all other wilderness areas throughout the world are under incredible pressure from growing amounts of visitors. Please do your part to help preserve these precious areas for future generations!

To learn more about the principles and practicing LNT please take a few minutes to visit the Leave No Trace Center for Outdoor Ethics. Your children and grandchildren will thank you!

Seven Leave No Trace Principles

  • Plan ahead and prepare.                                       
  • Travel and camp on durable surfaces.                 
  • Dispose of waste properly.                                                                         
  • Leave what you find.                                            
  • Minimize campfire impacts (be careful with fire).
  • Respect wildlife.  
  • Be considerate of other visitors.

Photo Gear Used On This Trip

Nikon D850
Nikkor Lens:
14-24mm 2.8G ED
24-70mm 2.8E ED
70-200mm 2.8E FL ED
Gitzo 1532 Tripod
Really Right Stuff B-55 Ball Head
Assorted Lee Graduated Neutral Density Filters
B+H Polarizing Filter
Vello FWM-N2 Remote Shutter Release

Titcomb Basin, Bridger Wilderness, Wind River Range WyomingView of Titcomb Basin and Island Lake #66356  Purchase

If you enjoyed reading Island Lake Wind River Range please share it with your friends and family.

And check out these other Wind River posts!
Cirque of the Towers Wind River Range
Bonneville Lakes Wind River Range
Titcomb Basin Wind River Range
Indian Basin Wind River Range
Green River Lakes Wind River Range
Central Wind River Range Backpacking
Pyramid and Shadow Lakes Wind River Range

All photos appearing in Island Lake Wind River Range are available for Commercial Licensing and Fine Art Prints. Click on any image to purchase, or contact me for more info!

Island Lake Wind River Range

Mount Bonneville and Little Bonneville Lake. Bridger Wilderness, Wind River Range Wyoming #66271

Bonneville Lakes Wind River Range

Bonneville Lakes Wind River Range

Mount Bonneville and Little Bonneville Lake. Bridger Wilderness, Wind River Range Wyoming Bonneville Lakes Wind River Range  #66272  Purchase

The second part of last summer’s Rocky Mountain photo tour took place in the Wind River Range of Wyoming. This spectacular section of the Rockies contains 40 peaks over 13,000 feet, the largest glacier in the American Rockies, and over 1300 named lakes. All are spread over three wilderness areas.  Several areas can get downright crowded with hikers and climbers. However, numerous trails rarely see any boot traffic.

My first destination in the Winds was one of those quiet spots, Bonneville Basin. While planning my stay in the Winds I was looking to visit an area that was new to me with good photo potential. I had seen photos of this area online and I was immediately impressed by its rugged beauty and remote feel.

There are a couple of trailheads accessing this area, Scab Creek and Big Sandy, both entail long miles of hiking to get to Bonneville Basin. I opted for Big Sandy since it starts higher and I was already familiar with it. The Big Sandy trailhead accesses one of the most popular areas in the Winds, Cirque of the Towers. I knew what to expect here, well over a hundred vehicles. Consequently, they were overflowing the parking lot and lining the road for nearly a mile. Therefore I arrived very early in the morning and found a spot right next to the trail kiosk.

Backpacker, Wind River Range, Wyoming Bonneville Lakes Wind River RangeOn the Fremont Trail near Dad’s Lake #66325  Purchase

Backpacking to Bonneville Lakes

Backpacking trails on the west side of the Winds can be somewhat deceiving. On a map, you will see trailheads starting at around 9000′ with your destination at around 10,000′. The length of your hike may be anywhere from 5-15 miles. This may lead you to believe that a relaxing hike with minimal elevation gain awaits you. But, in most cases, you would be dead wrong.

The Big Sandy Trailhead sits at 9080′, Bonneville Basin is at 10,500′, a mere 1500′ higher. However, in the 17 miles to the basin, you will hike a roller coaster of a trail. My rough tally was around 3000′ of elevation gain. The good news is that much of the distance you will be hiking at or above the tree-line, with awe-inspiring views most of the way.

Wind River Range, WyomingUnnamed lake along the Fremont Trail benchland #66257  Purchase

After an initial climb through the forest, the trail opens up into expansive subalpine meadows. The hiking is pleasant for the next five miles, as it passes picturesque lakes with great views. The first seven miles or so can feel like you’re on a freeway since the trail is shared with groups of backpackers doing the extremely popular Hailey-Washakie Loop. Solitude begins at the trail junction to Pyramid Lake, a short way beyond Marms Lake. This is where parties doing the Hailey-Washakie Loop exit the Fremont Trail. Although the loop trip was tempting I stayed with my original plan.

From here on I met a few other hikers, several of which were doing the Continental Divide Trail, or CDT. I always envy these hikers. Although they are on a trip of over 1000′ miles their packs are tiny and weigh next to nothing. Mine, however, is a great burden weighed down with heavy camera gear.

The Fremont Trail continues its roller-coaster nature for the next nine miles to the Raid Lake junction. An especially taxing point is the descent to East Fork Crossing, immediately followed by a stiff climb to a high plateau. I decided to call it a day and camp at an unnamed lake a few miles from the Raid Lake junction.

Sunburst rays over Mount Bonneville and Little Bonneville Lake. Bridger Wilderness, Wind River Range WyomingLittle Bonneville Lake #66285  Purchase

At Bonneville Lakes

The next day I hiked more ups and downs on the final few miles to the junction. Exiting the Fremont Trail I was now on a trail that was more like a route. The first mile or so gradually climbs and makes a few easy stream crossings. Then it tackles a headwall and climbs steeply through the forest.  After making that final grueling climb on the second day, the sight of Little Bonneville Lake was a nice reward. I should note here that until this point the trip was not truly in the mountains proper. Although it feels like you’re in the mountains as you hike the benchland, the real peaks are just to the east, along the Continental Divide. However, it wasn’t until I was at Little Bonneville Lakes that the big craggy peaks were all around me.

It was a bit of a surprise to see that in the entire lakes basin I saw only one other tent, and that party left a few hours after my arrival. Subsequently, I had the entire area all to myself. Little, or Lower, Bonneville Lake, in my opinion, is the most scenic of the three lakes in the basin. With small islands dotting the lake, and the spires of Mount Bonneville in the background, it is truly an impressive scene.

Mount Bonneville upper Bonneville Lake Wind River Range WyomingMount Bonneville and  Bonneville Lake  #66296  Purchase

Reaching Bonneville Lake requires some route-finding skills. Beyond the lower lake, there is a faint trail that approaches a headwall to the right of an obvious waterfall. At that point, it fades out. I ended up backtracking a bit until I found a break in the cliffs filled with a steep boulder field. Here I scrambled up to the top where it was an easy walk to upper Bonneville Lake.

Little Bonneville Lake. Bridger Wilderness, Wind River Range WyomingLittle Bonneville Lake #66308  Purchase

Here in the true alpine, the terrain takes on a barren look. Bonneville Lake is all cliffs and boulder fields, with only a few grassy areas to add color. Although another lake, Sheila, is a short way higher up, I didn’t bother to check it out. I was too busy relaxing in the sun and enjoying the view. Making my way back down to camp was a bit trickier since I had a difficult time finding the appropriate break in the cliffs again.

Mount Bonneville Wind River Range WyomingMount Bonneville, Little Bonneville Lake #66283b Purchase

Frustrating Light and Heading Out

Back at Little Bonneville, I had one more evening and morning left for photographing Mount Bonneville. Photography-wise the trip so far was a bit frustrating. This was mainly due to a lack of good light during golden hour and a nearly constant wind whipping up the surface of the lake. Every day from mid-morning to early evening there were some promising cloud formations. But for the most part, they either dissipated too soon or were in the wrong part of the sky. The area around Mount Bonneville itself only had a few tantalizing wisps to accent any compositions during the golden hour.

Leaving the next day was a difficult decision. It was such a beautiful area with excellent photographic potential, and I had come a long way to see it. But the weather forecast before I left predicted clear skies and wind for at least a week. So it didn’t seem that staying a day or two more would yield the conditions I needed for photography. And in the end, I was right. The weather on this hike was perfect for backpacking but not the best for photography.

Retracing my route on the hike out I enjoyed a sense of accomplishment. Meeting others on the trail I passed on information about how beautiful the lakes were and inquired about other areas I would like to visit in the future. The last night was spent at Dad’s Lake, a pleasant spot with lots of fishing potential, but not many views of the big peaks.

Fremont Trail near East North Fork RiverFremont Trail near East North Fork Crossing #66311  Purchase

Arriving back at the trailhead the parking lot was still packed with cars and parties of hikers and climbers eager to start on their own Wind River Range adventure. I chatted it up a bit with some of them, then headed back to Pinedale for some good food. I also replenished supplies since I would soon be starting on the longest backpack of the trip. Two days later I would be on the trail to Island Lake and Titcomb Basin in the Central Wind River Range.

If You Go to Bonneville Lakes Wind River Range

Trail info:
Round Trip Distance:  40 miles
Elevation:  Trailhead 9085′ Bonneville Lake 10,800′
About 6000′ gain and 2500′ loss along the length of the trail.
Difficulty:  Moderate hiking but strenuous due to length and elevation changes
Red Tape: As of 2019, no permits are needed

The Big Sandy Trailhead is located 57 miles south of Pinedale. About 27 miles of it is on dusty gravel roads, with the last 10 miles being rough and narrow. There is lots of traffic, and on the last segment, you must remain alert on curves for oncoming cars, and especially for horse trailers. There are excellent campsites in the last few miles before the trailhead. I took advantage of them so as to organize my gear and also to get a parking spot and early start the next morning.

Make sure you take along plenty of insect repellant. The Winds are especially notorious for their ravenous hordes of mosquitoes and flies. Although they weren’t too bad during my trip in mid-August. Also, be prepared for dramatic weather changes. I had beautiful warm sunshine, but due to the elevation, the wind was very cold. Consequently, I was hot on one side and chilled on the other.

The town of Pinedale makes a great base for multiple trips into the Winds. It has everything you’ll need, from good food and lodging to one of my favorite outdoor recreation stores, the Great Outdoor Shop. It’s stocked with everything needed for a successful trip, including a very knowledgeable and friendly staff. Don’t visit Pinedale without dropping in! Right next door to the great Outdoor Shop is the best place to go for a post-trip meal, the Wind River Brewing Company. They have excellent burgers and great brews!

Unnamed lake along Fremont Trail Bridger Wilderness Wind River RangeUnnamed lake along the Fremont Trail benchland #66262  Purchase

And now for a short lecture. As I’ve been saying in previous posts, don’t even think about visiting this or any other wilderness area unless you are prepared to strictly follow the guidelines of Leave No Trace (LNT). The Wind River Range and all other wilderness areas throughout the world are under incredible pressure from growing amounts of visitors. Please do your part to help preserve these precious areas for future generations!

To learn more about the principles and practicing LNT please take a few minutes to visit the Leave No Trace Center for Outdoor Ethics. Your children and grandchildren will thank you!

Seven Leave No Trace Principles

  • Plan ahead and prepare.                                       
  • Travel and camp on durable surfaces.                 
  • Dispose of waste properly.                                                                         
  • Leave what you find.                                            
  • Minimize campfire impacts (be careful with fire).
  • Respect wildlife.  
  • Be considerate of other visitors.

Photo Gear Used On This Trip

Nikon D850
Nikkor Lens:
14-24mm 2.8G ED
24-70mm 2.8E ED
70-200mm 2.8E FL ED
Gitzo 1532 Tripod
Really Right Stuff B-55 Ball Head
Assorted Lee Graduated Neutral Density Filters
B+H Polarizing Filter
Vello FWM-N2 Remote Shutter Release

Mount Bonneville and Little Bonneville Lake. Bridger Wilderness, Wind River Range WyomingMount Bonneville Bridger Wilderness #66270  #Purchase

If you enjoyed reading Bonneville Lakes Wind River Range please share it with your friends and family.

And check out these other Wind River posts!
Cirque of the Towers Wind River Range
Island Lake Wind River Range

Titcomb Basin Wind River Range
Indian Basin Wind River Range
Green River Lakes Wind River Range
Central Wind River Range Backpacking
Pyramid and Shadow Lakes Wind River Range

All photos appearing in Bonneville Lakes Wind River Range are available for Commercial Licensing and Fine Art Prints. Click on any image to purchase, or contact me for more info!

Bonneville Lakes Wind River Range